Do you have videos on your website?
If so, this post is for you.
They click it and Google Analytics tracks it. That’s how it works, right? It tracks the visitor’s actions and reports it back to you, right? Not exactly.
Lots of clicks aren’t tracked in Analytics by default. That’s because some clicks don’t bring the visitor to a new page. And pageviews are mainly what Google Analytics is tracking …unless you do a bit of extra setup.
Video plays are #7 on our list of interactions that aren’t recorded in Analytics without event tracking.
![]()
Each of these interactions are trackable, but only through event tracking. And the easiest, fastest way to track events is with Google Tag Manager.
This video shows how to track video views in Google Analytics using Google Tag Manager. The play button on this video is tracked using the method described here…
Once complete, you’ll be able to see which videos are viewed how many times. We’ll also show you how to use Google Analytics segments to compare the behavior of video watchers with non-watchers.
Three notes:
- This post assumes you have Google Analytics (GA) set up.
If you’re not sure, check this article for detailed instructions.
- This post assumes you have Google Tag Manager (GTM) set up.
If you’re not sure what this means, first read this article, which explains everything. - This post shows you how to track YouTube videos.
If you embed videos using another video player, you’ll need to add a custom HTML tag. See documentation from your hosting service or ask your web developer for help.
To set up event tracking, we’ll create a tag and a trigger in Google Tag Manager. But first, we’ll need to configure a few variables. Log into Google Tag Manager, then follow these steps:
1. Configure variables
The variables we’ll need are built-in, but not configured by default. So we’ll need to take this step first.
A. Click on “Variables” in the menu on the left.
B. Click on “Configure” in the top right.
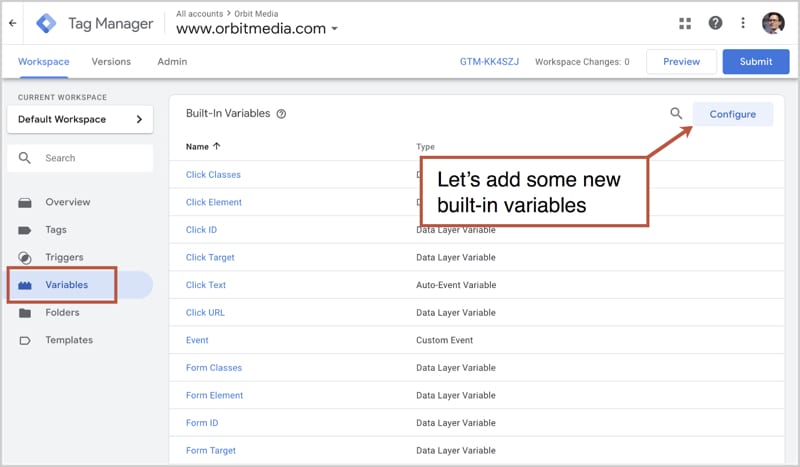
Now you’re looking at a list of the built-in variables.
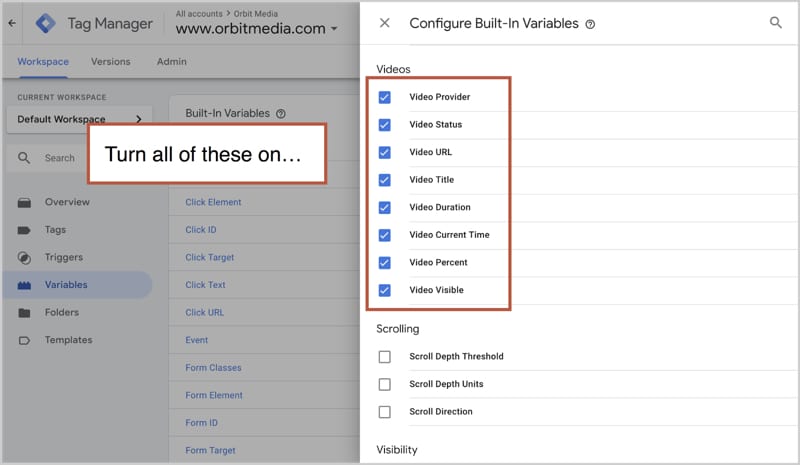
C. Check the box for every variable in the “Videos” section. Even if you don’t plan to use them all, there’s no harm in configuring all of them.
All done. Now we’ll create the trigger. You could also create the Tag first. It doesn’t really matter.
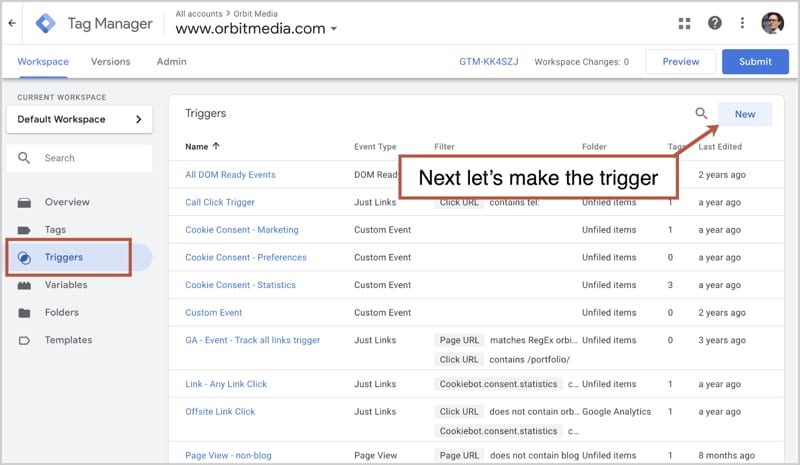
2. Make the trigger
A. Click on “Triggers” in the menu on the left.
B. Click on “New” in the top right.
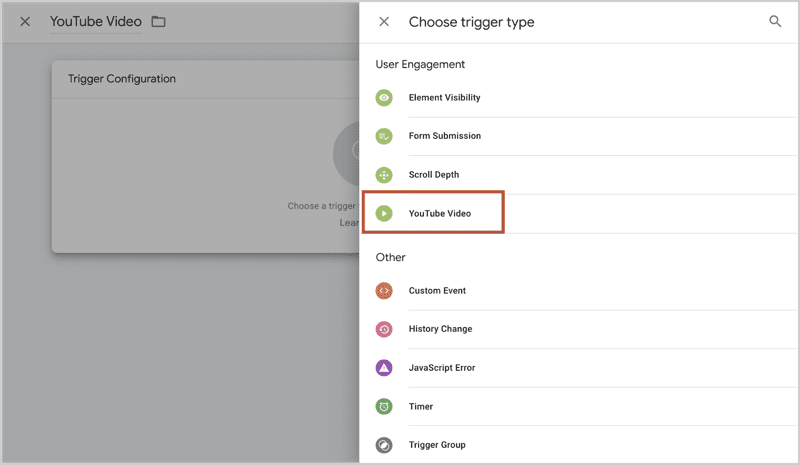
C. Give your trigger a name. Give it a simple, descriptive, standard name that will make sense when your successor sees it five years from now. I recommend “YouTube Video” or something similar.
D. Click “Choose a trigger type” …that’s the middle of the big white Trigger Configuration box.
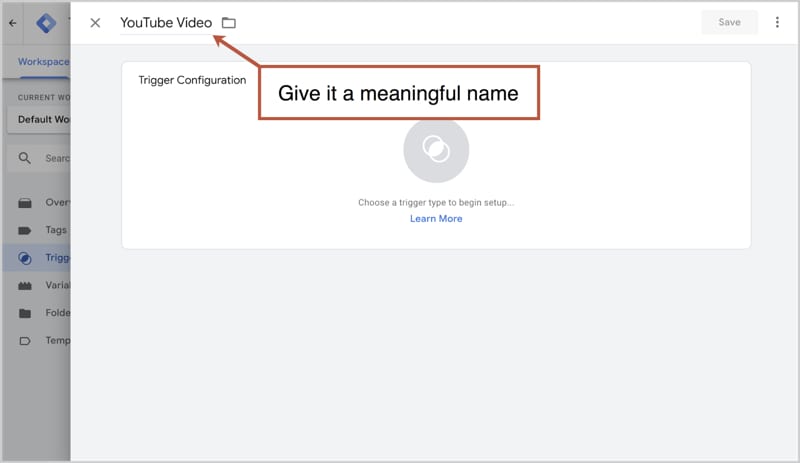
E. Select “YouTube Video” from the menu.
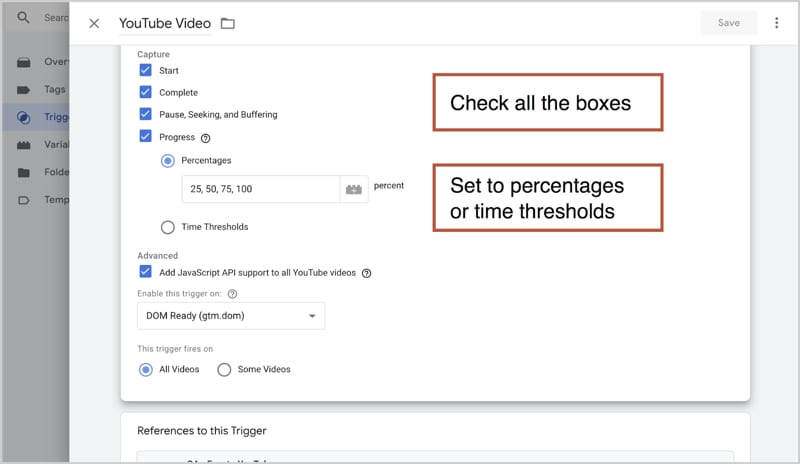
Next, we’ll tell the trigger when to fire. These are the moments when data will be captured within the browser and then sent to Google Analytics servers.
F. Check the first two boxes: Start and Complete.
G. Leave “DOM Ready” in the dropdown box under “Enable this trigger on.” That means the trigger will be ready to fire when the data-layer on the browser is ready to listen. No need to change this.
Optional settings:
H. Check Pause/Seek/Buffering, and Progress.
For “Progress” you can have the trigger fire either when the video hits a certain percentage completion or when the video hits a certain time threshold (hours, minutes and seconds)
I. Check the “Add JavaScript API support” box.
There is a fancy way to embed YouTube videos. It uses an API. You can check this box whether or not you use the API. Either way, it won’t cause any problem.
J. Save the trigger by clicking the big blue button in the top right.
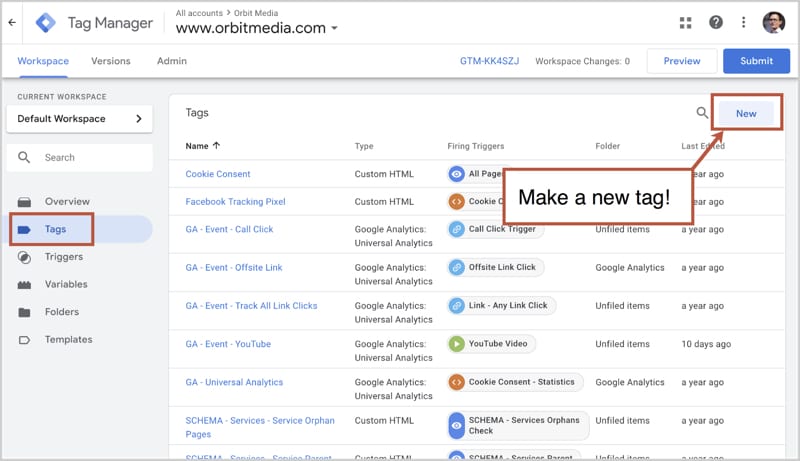
3. Make the tag
Next, we’ll make the tag that tracks video views. This step is easy because Google Analytics tag for YouTube are built into GTM already. This’ll be a piece of cake.
A. Click on “Tags” in the menu on the left.
B. Click on “New” in the top right.
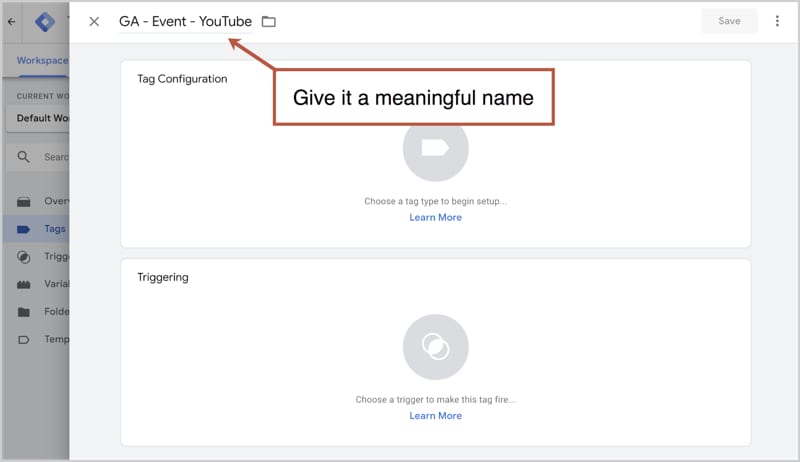
C. Give your tag a name. Again, name it something simple, descriptive and standard. I recommend “GA – Event – YouTube.”
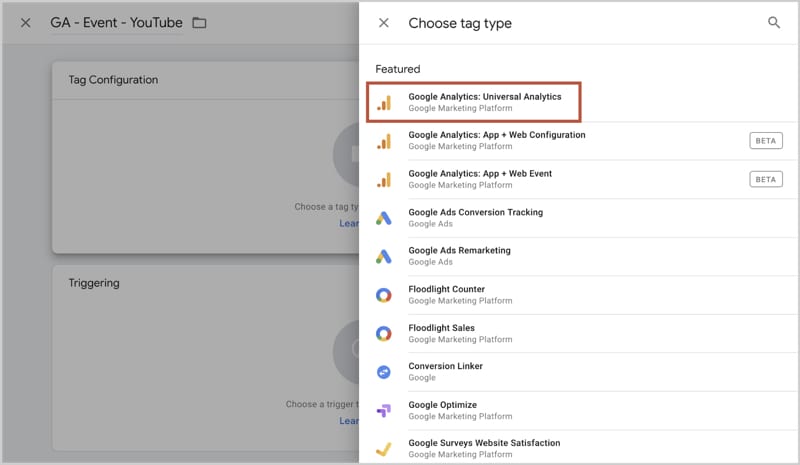
D. Click “Choose a tag type” …that’s the middle of the big white Tag Configuration box.
E. Select “Google Analytics: Universal Analytics” from the menu ...assuming you haven’t yet switched over to App + Web!
Now we’re going to set up the event.
F. Select “Event” from the Track Type dropdown.
G. In the Category field, Type “Video view” (or something similar).
H. To the right of the Action field, click the lego icon to choose a variable (which we configured in step one). Select “Video Title” from the list.
I. Same. To the right of the Label field, click the lego icon and choose “Video Status” from the variable list.
Optional settings:
J. To the right of the Value field, click the little lego icon to choose a variable (which we configured in step one). Select “Video Percent” from the list. This lets you track how much of each video your visitors watch.
K. Recommended: Change “Non-Interaction Hit” to True.
This will keep the event from affecting your bounce rate. Personally, I think bounce rate is an overrated metric. But if it matters to you, here’s where you can control whether this event will affect your bounce rate.
Unless you change this to true, visits (sessions) with video views will not be counted as bounces (one-hit sessions).
L. Under Google Analytics Settings, add your account’s Tracking ID.
![]()
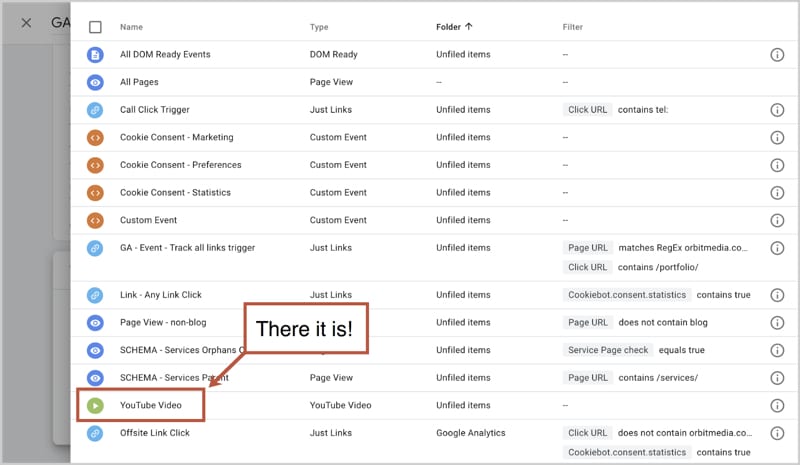
M. Click anywhere in the big white Triggering box to choose a trigger for your new tag.
N. Click on the YouTube Video trigger from the list.
4. Submit your container
Almost done! Now that you have a new tag and a new trigger in your Workspace, your last step is to submit this new container to your site. It’s the blue button in the top right.
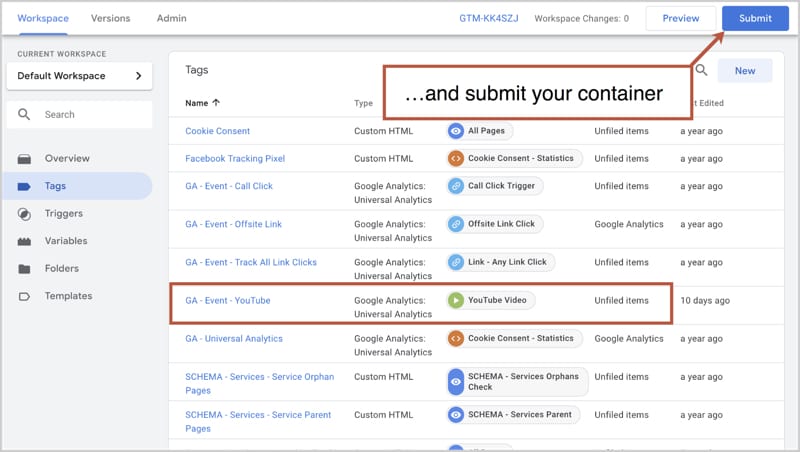
Tag Manager will give you the opportunity to document your new container. Add a few notes such as “Created a new tag and trigger for tracking YouTube videos views” and sign your name.
You can test your event just by going to the Real Time > Events report. Take out your phone, go to a page with a video and click play. See the event?
Here are three more ways to test.
- Google Tag Manager Debug mode (tutorial).
- Chrome Developer Tools (tutorial).
- This Chrome extension (get it here) shows you every time any event fires on any site.
5. Segment and analyze
Depending on how much traffic you get to the pages with videos, you may need to let it run for a few weeks before you have enough data to analyze.
When you’re ready, here’s a fun way to look at viewers and non-viewers separately to measure the performance of your video-enhanced content.
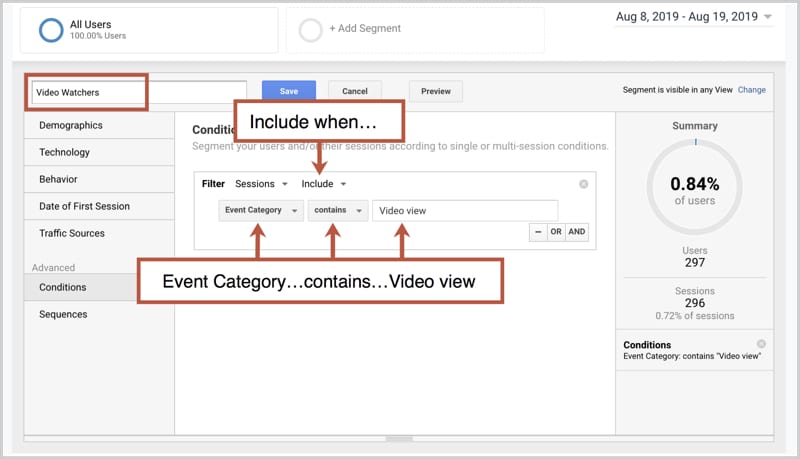
Create a segment for viewers and non-viewers
- Click +Add Segment at the top of any report.
- Click the red +New Segment button.
- Click “Conditions” from the menu on the left.
- Leave the “Sessions” and “Include” dropdowns unchanged.
- Select “Event Category” and “contains” from the next two dropdowns.
- Enter “Video view” into the field.
- Name your segment (something like “Video Watchers” and click Save.
Next, repeat the process but select “Exclude” from the drop-down and name this group “Video non-watchers” or something similar.
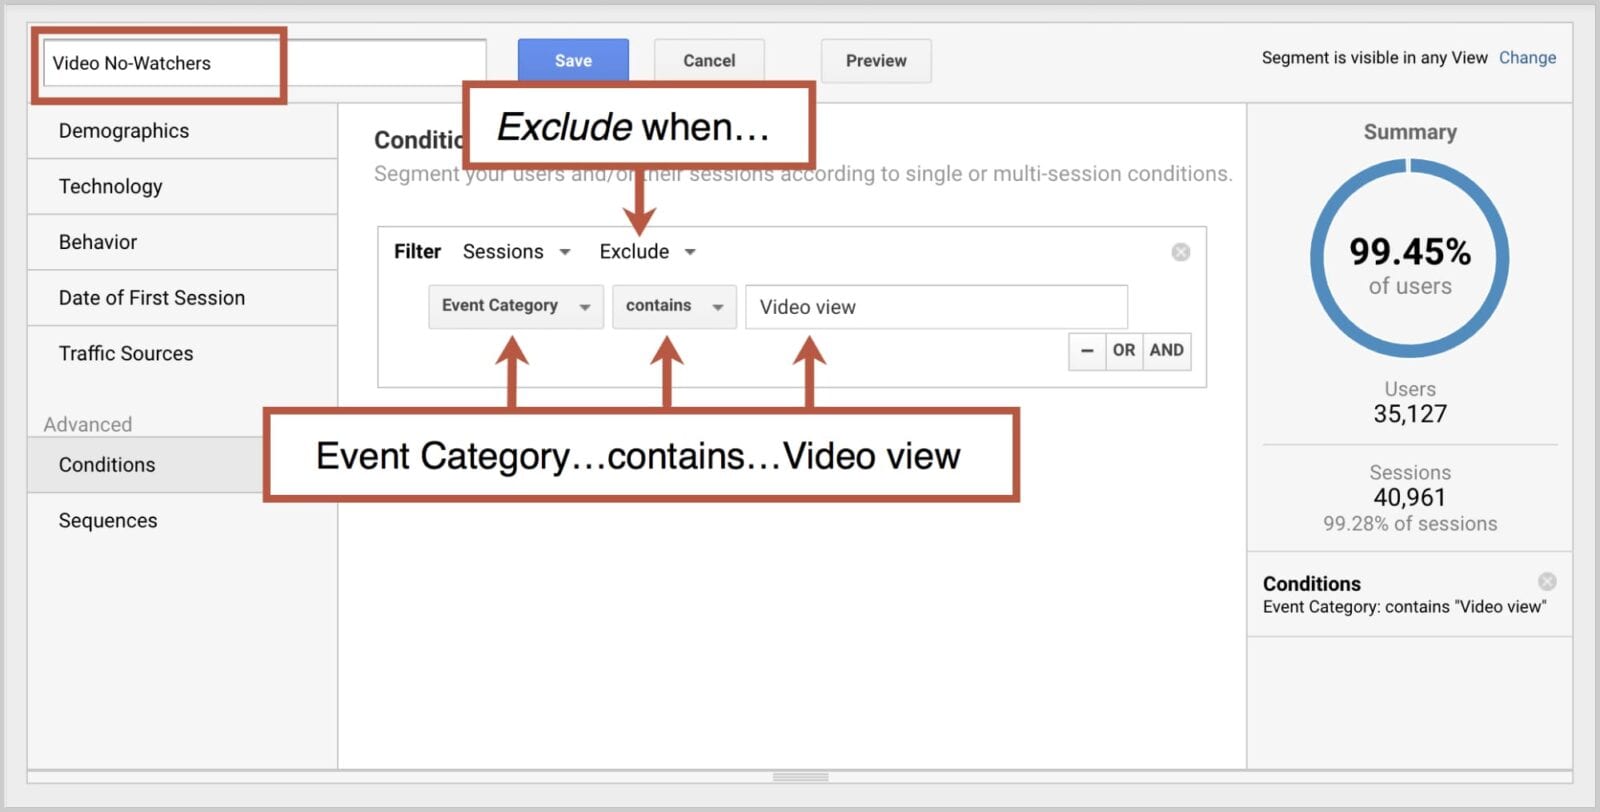
Now as you browse through Analytics, you’ll see all of the data broken into these two groups: those who view videos and those who don’t.
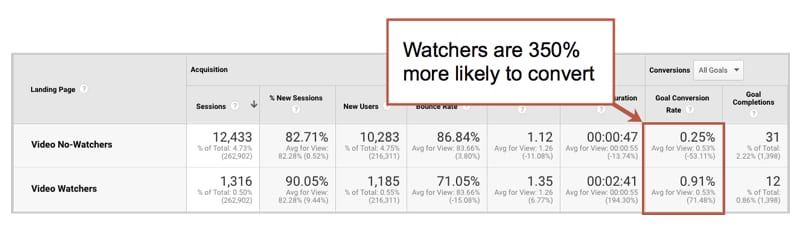
Now check the differences between video viewers and non-viewers…
All that work is only useful if we get some meaningful, actionable insights and take action.
You can look at aggregate data to see general differences between these groups. But it’s far better to look at the performance at the page/video level.
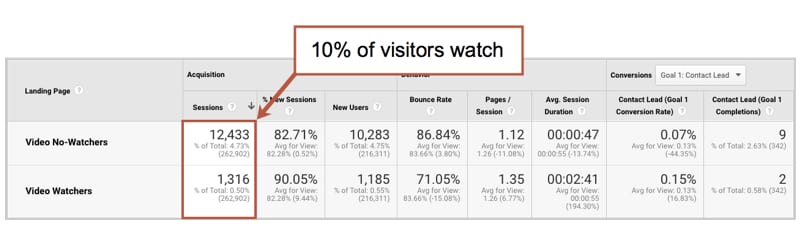
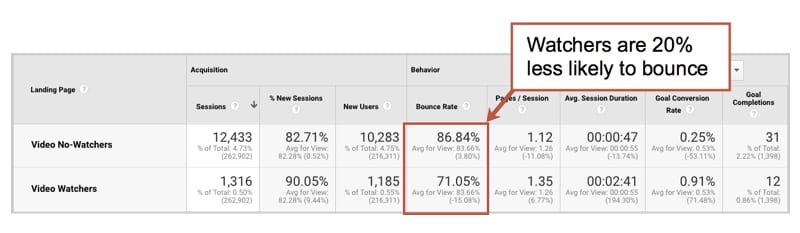
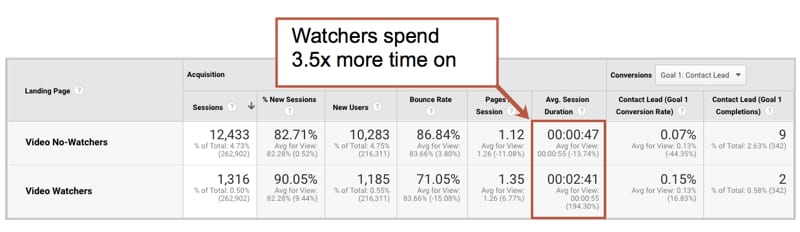
Go to Behavior > Site Content > Landing Pages and pick a page with a video.
With the two segments turned on, you’ll quickly see the following:
- What percentage of people are watching the video?
- Are the video viewers less likely to bounce? How much less?
- Do video viewers spend more time on the page? How much more?
- Are video viewers more likely to convert? (subscribe, become a lead) How much more?
Here are the answers to those questions for a page/video on this website:
You can now check the specific ROI for any video on any page.
Thanks, event tracking!
Thanks, Google Tag Manager!
For a more robust way to track video engagement, our friend and Analytics expert Charles Farina shows how to go deeper using custom dimensions in this post.
More opportunities for analysis and action
Now that you know the impact of video on the performance of a page, use your new event to answer more questions and do deeper analysis.
Which blog posts would benefit the most from a video?
- Go to Behavior > Site Content > All Pages.
- Filter for blog (which is easy if your blog is in a directory).
Any page with high traffic (pageviews) and low engagement (avg. time on page) is a good candidate for video. Videos here would have both the greatest reach and highest impact.
Are these YouTube videos being watched on the site or on YouTube.com?
- Set date range to start with the day the video was launched (uploaded to YouTube and embedded on your site).
- Go to Behavior > Top Events.
- Drill down on “Video view” then drill down to a specific video.
- Compare “start” metric here with total views on YouTube.
If the video is more often seen on your site that YouTube, edit the title and description on YouTube to better align it with a keyphrase. Maybe you can get it to rank higher there.
Which videos have a low play rate and need a better thumbnail?
- Go to Behavior > Site Content > Landing Pages.
- Add the “Video watchers” and “Video no-watchers” segments (see above).
- Drill down on a Landing Page with videos.
- Calculate the play rate (Video watchers sessions divided by total sessions).
For videos with a very low play rate (less than 10%), make a better thumbnail. Videos with thumbnails that include both faces and headlines get viewed the most.
Recommended: The 3 types of marketing videos
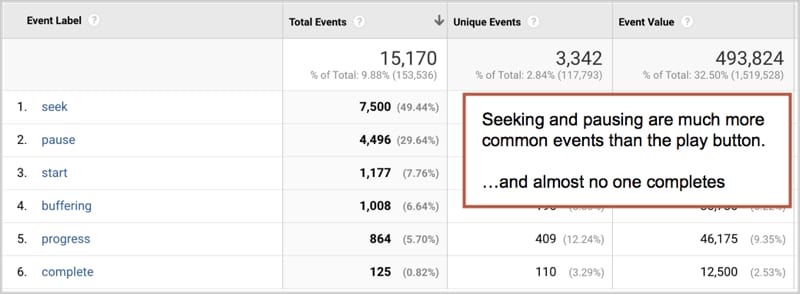
Which videos are long and possibly boring?
- Go to the Events > Top Events report.
- Drill down into “Video view.”
- Drill down on a specific video.
You’re now looking at the Event Labels for that video. This is how people are interacting with that specific video. Even without checking the percentage watched, you can see if viewers are jumping around.
If “seek” and “pause” have bigger totals than start, then people are jumping around. The video may be very long or start slow. This is what the report looks like for a long, training video.
Lights, camera, tracking!
Embedding videos is easy. Tracking video views takes a bit more work. But it’s worth it. Once you have this set up on your site, you’ll be measuring video ROI like a champ.
The post How to Track Video Views in Google Analytics Using Google Tag Manager in 4 Steps appeared first on Orbit Media Studios.
from Orbit Media Studios https://www.orbitmedia.com/blog/tracking-video-views-google-analytics-tag-manager/
via IFTTT
from
https://sarahbarnett0.wordpress.com/2019/12/04/how-to-track-video-views-in-google-analytics-using-google-tag-manager-in-4-steps/
No comments:
Post a Comment