Wednesday, November 4, 2020

How to Get More Followers on Twitter (the Semi-Legit Way)

Social media marketers put high value on the size of a following, so here’s a conversation that happens a lot between marketers.

Q: “How do I get more Twitter followers?”

A: “Tweet more, engage with people, share something useful or provocative.”

Sound familiar? Maybe you’ve heard this conversation or been part of it. Maybe dozens of times.

But here’s a less common question:

Q: “Why do some Twitter accounts grow faster than others?” 

This post answers that question. Then it goes into some practical tips to grow your Twitter following, including some of the more spammy tactics. Yes, we’re going to step over to the dark side of social media.

Quick disclaimer: before you scorch me in the comments, please understand that this post is informational only. These are not recommendations or judgements.

Why do some Twitter followings grow faster than others?

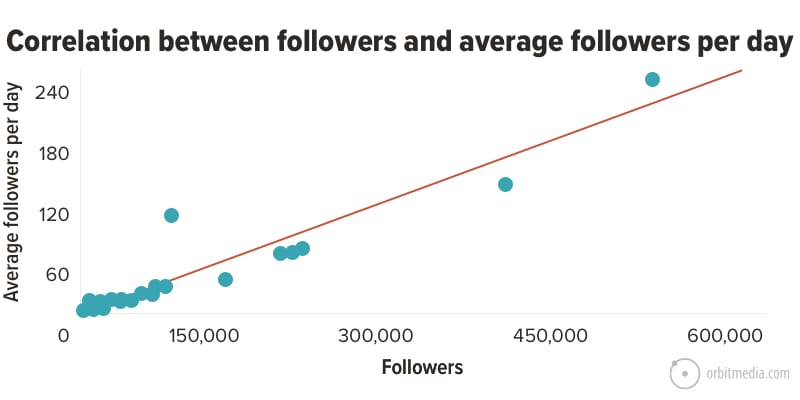
We analyzed the Twitter accounts of 300 bloggers and marketers to discover what actually correlates with follower growth. We used Follower Wonk to check the number of followers, number of tweets per week, total tweets over time and the likelihood of retweets.

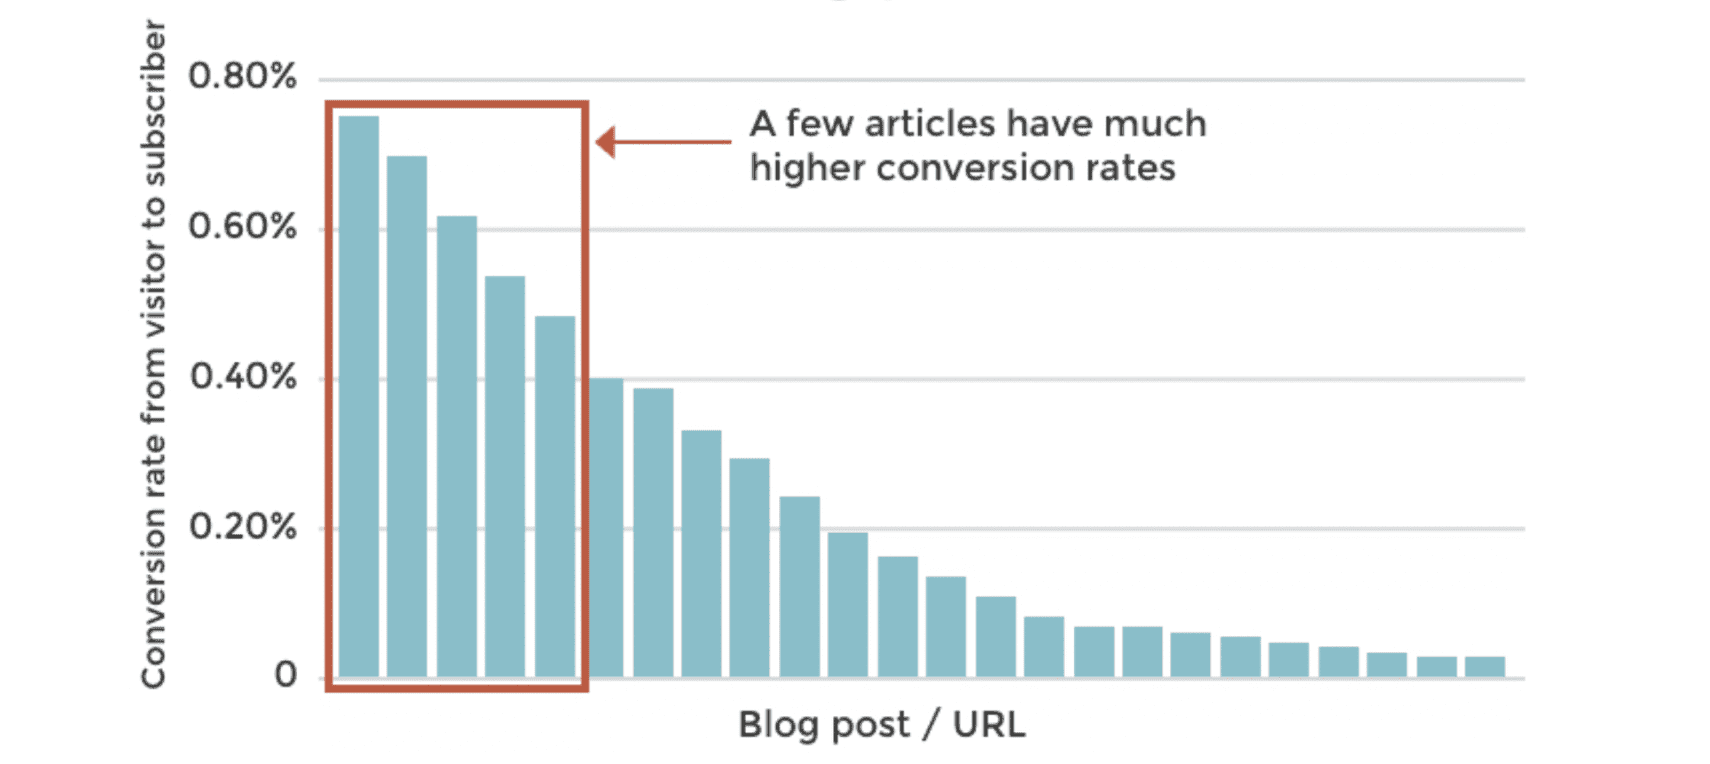
Each of these correlates with follower growth at different rates. The findings might surprise you. Here’s the data.
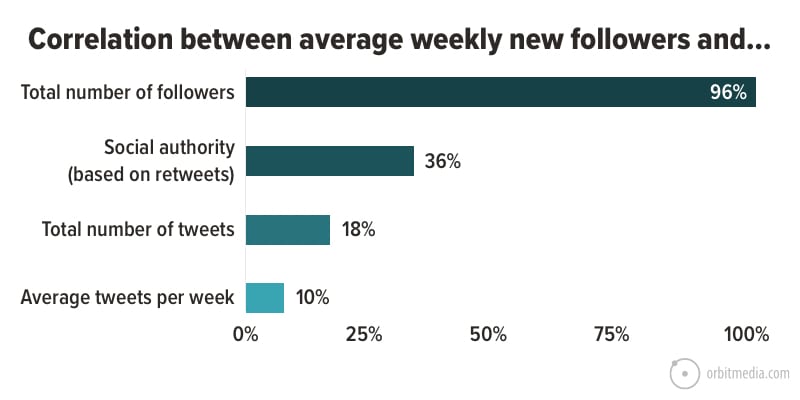
Surprised? I was.

  • Tweeting a lot DOES NOT correlate with follower growth.
    The statistical relationship is very weak. Only 10% of the accounts that tweet a lot are growing fast.
  • Getting retweeted DOES correlate with faster growth.
    In 35% of cases, Twitter accounts that get retweeted a lot are also the accounts that grow fast. This suggests that being engaging does help.
  • Big Twitter accounts grow much faster.
    Size matters a lot. The size of the following has a powerful relationship with the follower growth rate, much more than any other factor. Twitter accounts with large followings are the fastest growing accounts in 96% of cases.

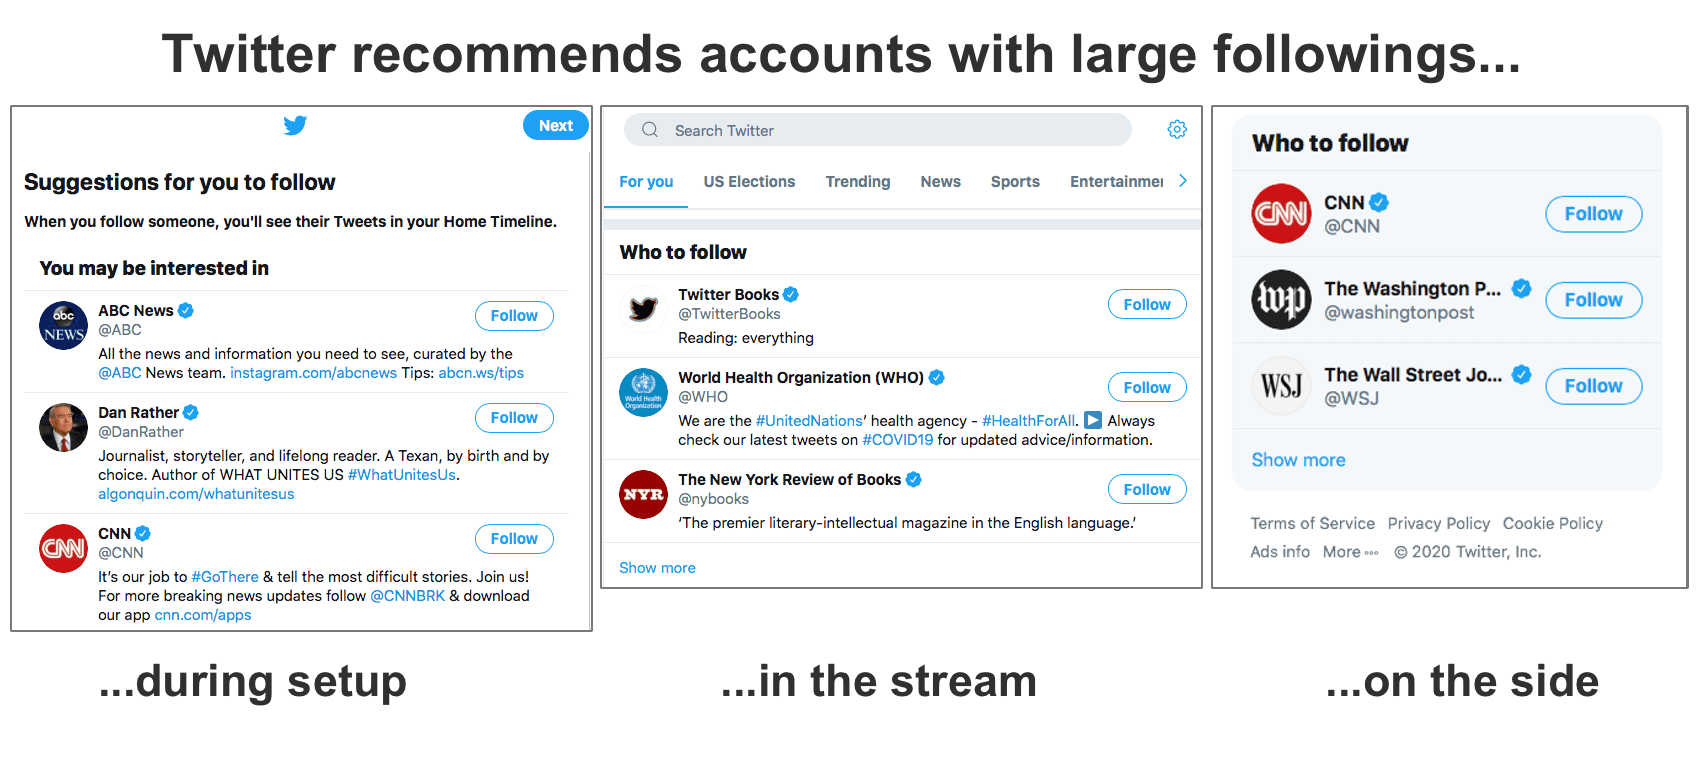
Why do the big accounts grow faster?

It’s partly due to the design of Twitter. From the moment you set up a Twitter account, it starts recommending accounts with large followings. It promotes these accounts in many places and ways.

And then of course, there’s the bandwagon effect, aka the conformity bias. A lot of followers? It’s gotta be good! 

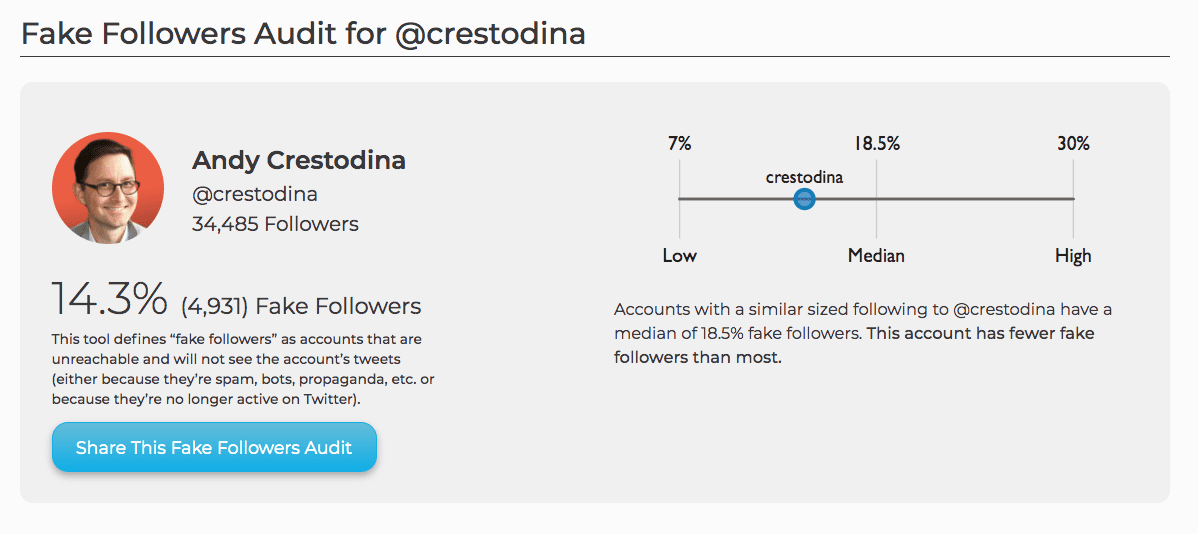
A large following is social proof. It’s evidence of legitimacy, even if that following is not an engaged audience. Even if a large percentage are fake.

No one checks for fake followers before clicking the follow button, right?

fake followers

Regardless of the reason, it’s clear that big accounts grow faster.

So it’s a chicken and egg problem. The key to getting more followers is to have a large Twitter following. But how do you get followers in the first place?

Here are ten ways to grow your Twitter following, from sketchy and spammy to human and high-touch.

1.  Auto Follow / Auto Favorite

Rating:  Spammy 🤖

When you follow someone or favorite a tweet, you appear in their notifications.

Some of them will notice you, check you out and follow you back.

This is the most common way to inflate a following fast. It explains why a lot of random people may be engaging with you on Twitter.

These two activities, following and favoriting others, will gradually grow your account, but it’s slow …unless you automate it with a robot. Here are two tools for automating Twitter activity, so you can do social media without actually being social!

Note: We don’t use these tools. We aren’t recommending them. We are simply explaining one type of social media automation. 

  • Hypegrowth – Follows other accounts for you
  • TweetFavy – Favorites people’s tweets for you
  • ManageFlitter – Unfollows people who don’t follow you back (manual)

That last one keeps your following / followers ratio in balance. So your account looks less spammy.

But these accounts are still easy to spot: lots of followers, the followers and following numbers are almost the same …and often and there are very few tweets.

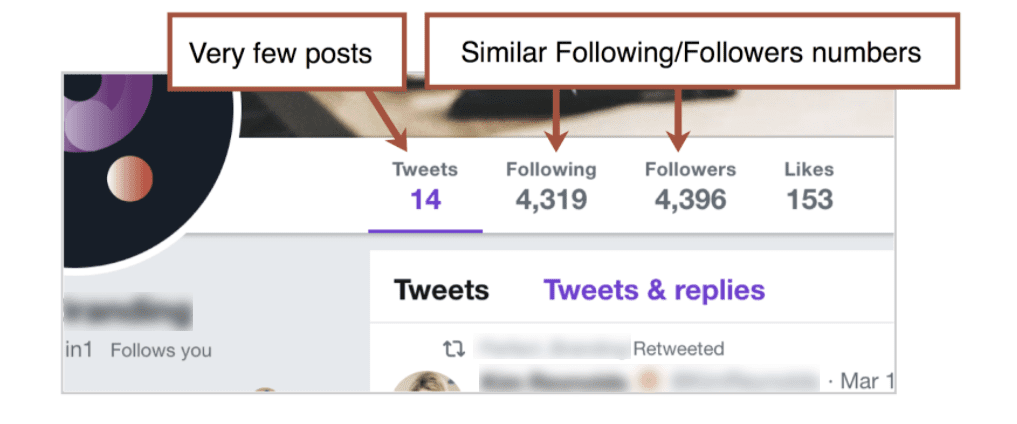
If you’re simply trying to grow your following, you’re actually looking for spam accounts like these. Follow them and they’ll follow back.

Your robot and their robot can be friends!

Of course, these tools will win you a mostly irrelevant, unengaged following. Not very social, but hey, it was easy, right?

2. Manually follow, automatically unfollow

Rating: Sketchy

Rather than use a robot, you can do it by hand.

Spend a little time on Twitter every day and simply follow a bunch of people. Look for these Twitter users:

  • Anyone who looks likely to follow back (they have a close follower/following ratio)
  • Anyone with #followback or #TEAMFOLLOWBACK in their profile
  • Anyone with 10+ emojis in their bio, especially 🏆🏅🎯💰🔮🙌🌼🎧🎼

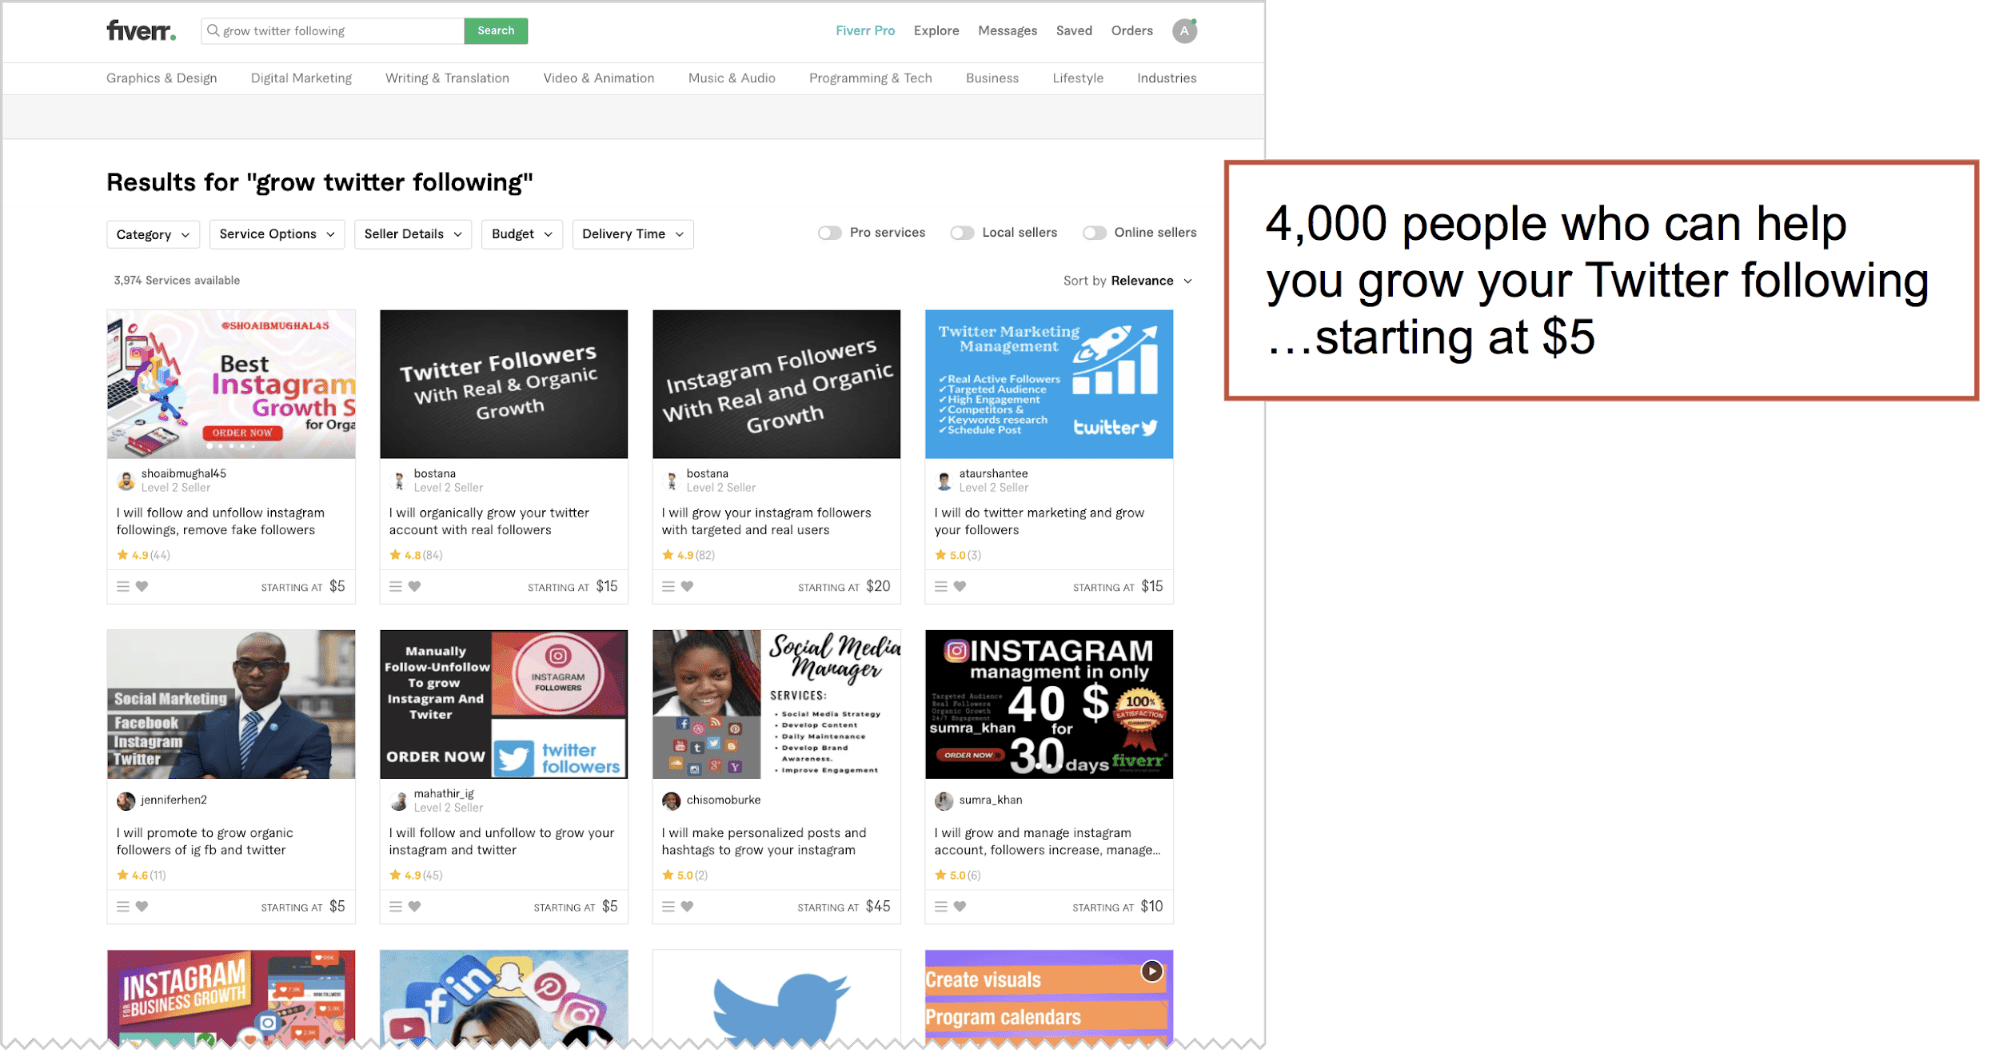
If the manual approach gets boring, you can find someone on Fiverr to do it for you.

3. “The Yank”

Rating: Sketchy

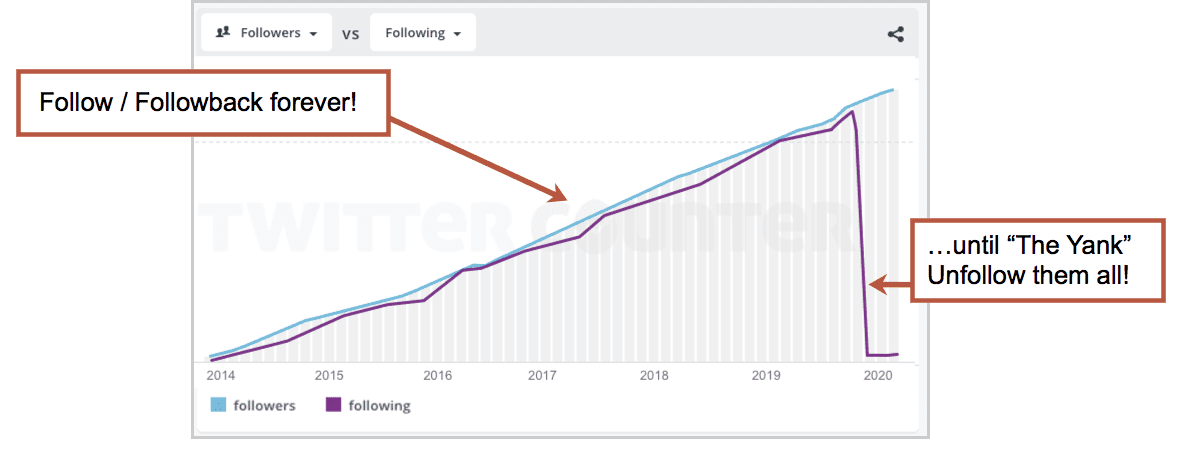
Here’s a way to create artificial fame. Use your new autofollow/followback robots to build up a large following of maybe 100k+ accounts. Then, on a sunny morning… unfollow everyone!

It’s known as the “mass unfollow” and here’s what it looks like. It’s also common on Instagram, not just Twitter.


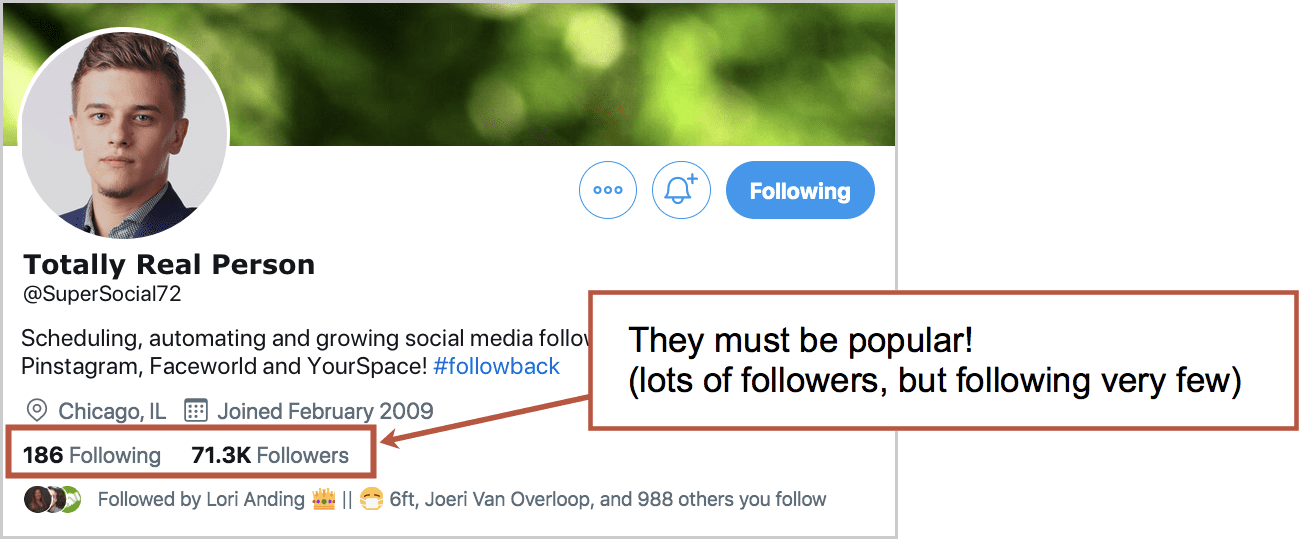
Now, at a glance, you’ll appear to be loved by thousands …but you are quite picky about who you follow. You must be a rockstar. Put a velvet rope around your phone.

That’s the sketchy way to get 100k followers but only follow 10 people. Sure, you’ll hurt some feelings, but pseudo-celebrity has its price.

Interesting read: Chris Brogan (legitimate influencer and thought leader) did this back in 2011, partly as an experiment and partly to reduce direct message spam. He wrote about his experience here.

Now let’s move on to some more legitimate ways to grow a Twitter following.

4. Nail your profile picture

Rating: No-brainer

You’re trying to be more visible. To stand out. They won’t follow you if they don’t notice you.

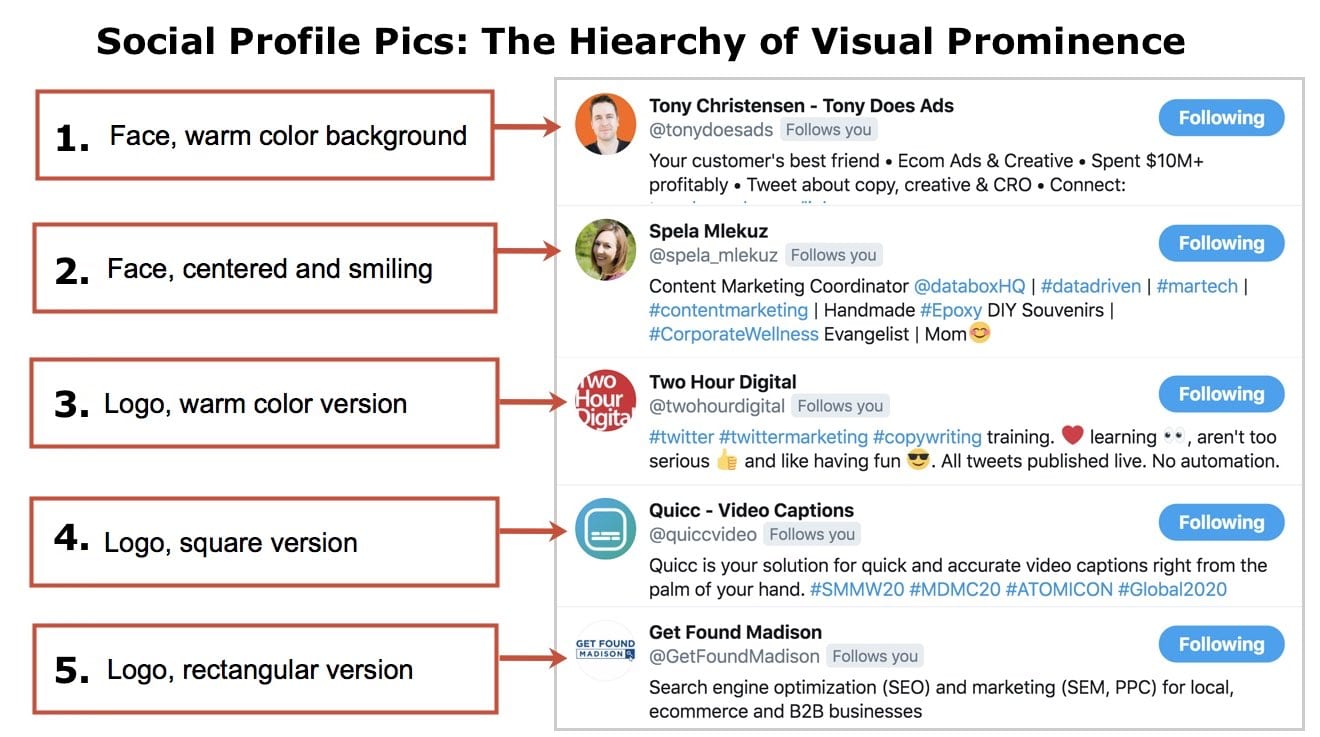
These are our best tips for social media profile pictures. Here’s a quick summary for visibility in Twitter, where competition for attention is fierce:

  1. Warm colors stand out
    The Twitter interface is dominated by cool colors (blues in the logo and UX) so warm colors stand out (red, orange and yellow). So a picture with
  2. Faces are more prominent than logos
    Be a person, if at all possible. Show your face and smile big for the camera.
  3. Rectangular logos look tiny
    Uploaded logos should have a square (1×1) aspect ratio. Upload a wide logo and it might be legible on your profile page, but too small to see in streams, where it’s squished down to 50 x 50 pixels or even 20 x 20 pixels in some places.

Put those together and you have a hierarchy for visual prominence in Twitter profile pictures. The profile pics at the top stand out much more, don’t they?

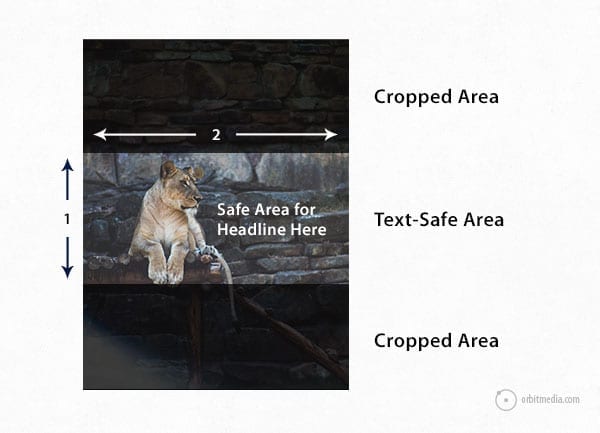
Once you’ve got your profile picture optimized for visual prominence, work on your header image. Make it non-boring. That means interesting, clever, unexpected, helpful or funny. And make sure it looks professional.

5. Write a descriptive Twitter bio

Rating: No-brainer

A lot of Twitter bios are just “About Us” content. That’s fine. But boring, maybe. Here are three ways to write a bio that grows your following:

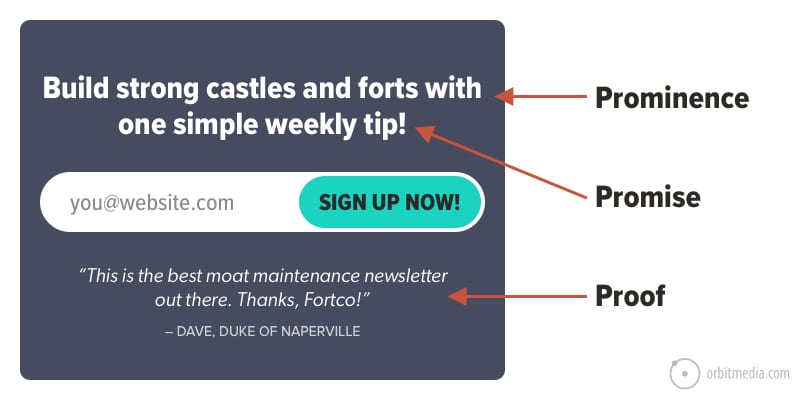
Make your bio a call to action.

Some Twitter bios actually give people a reason to follow you. It tells them specifically what they’re going to get. Names the topics while adding a little credibility. A Twitter bio can be a little CTA.

Compare these two examples:

Optimize your bio to rank in Twitter search.

Another reason to write a descriptive bio is SEO. You can optimize your bio, making it more likely to appear in Twitter searches, by adding relevant keywords. Make sure a few keyphrases are in there. And make sure to add your city, if possible.

Twitter is still a research tool for a lot of users. Imagine you’re a prospect or journalist, looking for you. How do you search? What do you find?

Avoid hashtags in your bio.

For this, I have no evidence or research. But I do have common sense. Hashtags within bios aren’t likely to help your bio get found. They are really just little opportunities to leave your bio page. They’re actually competing with the follow button.


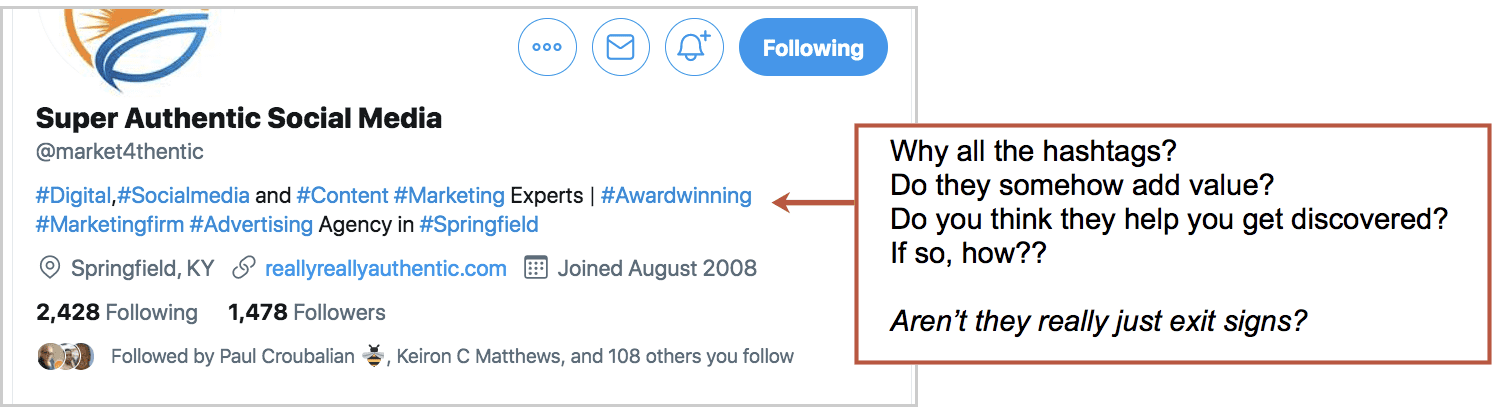
I’m all in for a hashtag (maybe two) on a tweet. But this isn’t a social post, it’s your bio. Hold the hashtags, please.

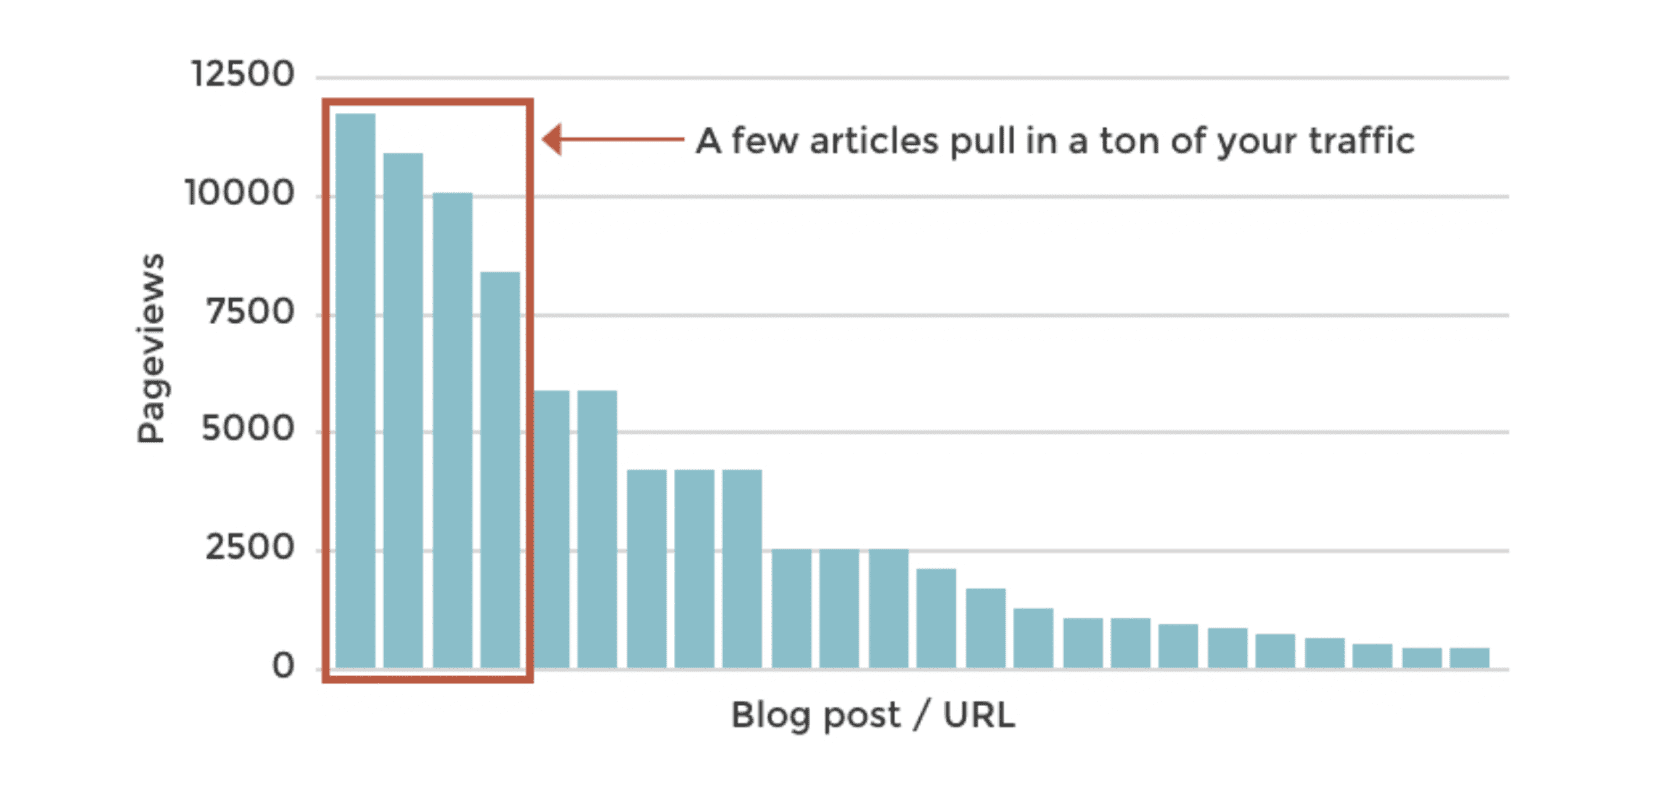
6. Find your top performing tweets and post them again

Some of your social posts are 10x and 100x as engaging as the others. They get exponentially more likes, shares and comments, so these posts are 100x more effective at making your account visible.

If you’re actively watching the streams, you know which posts get engagement.

If you schedule your tweets using a tool like Hootsuite or Buffer, check the analytics.

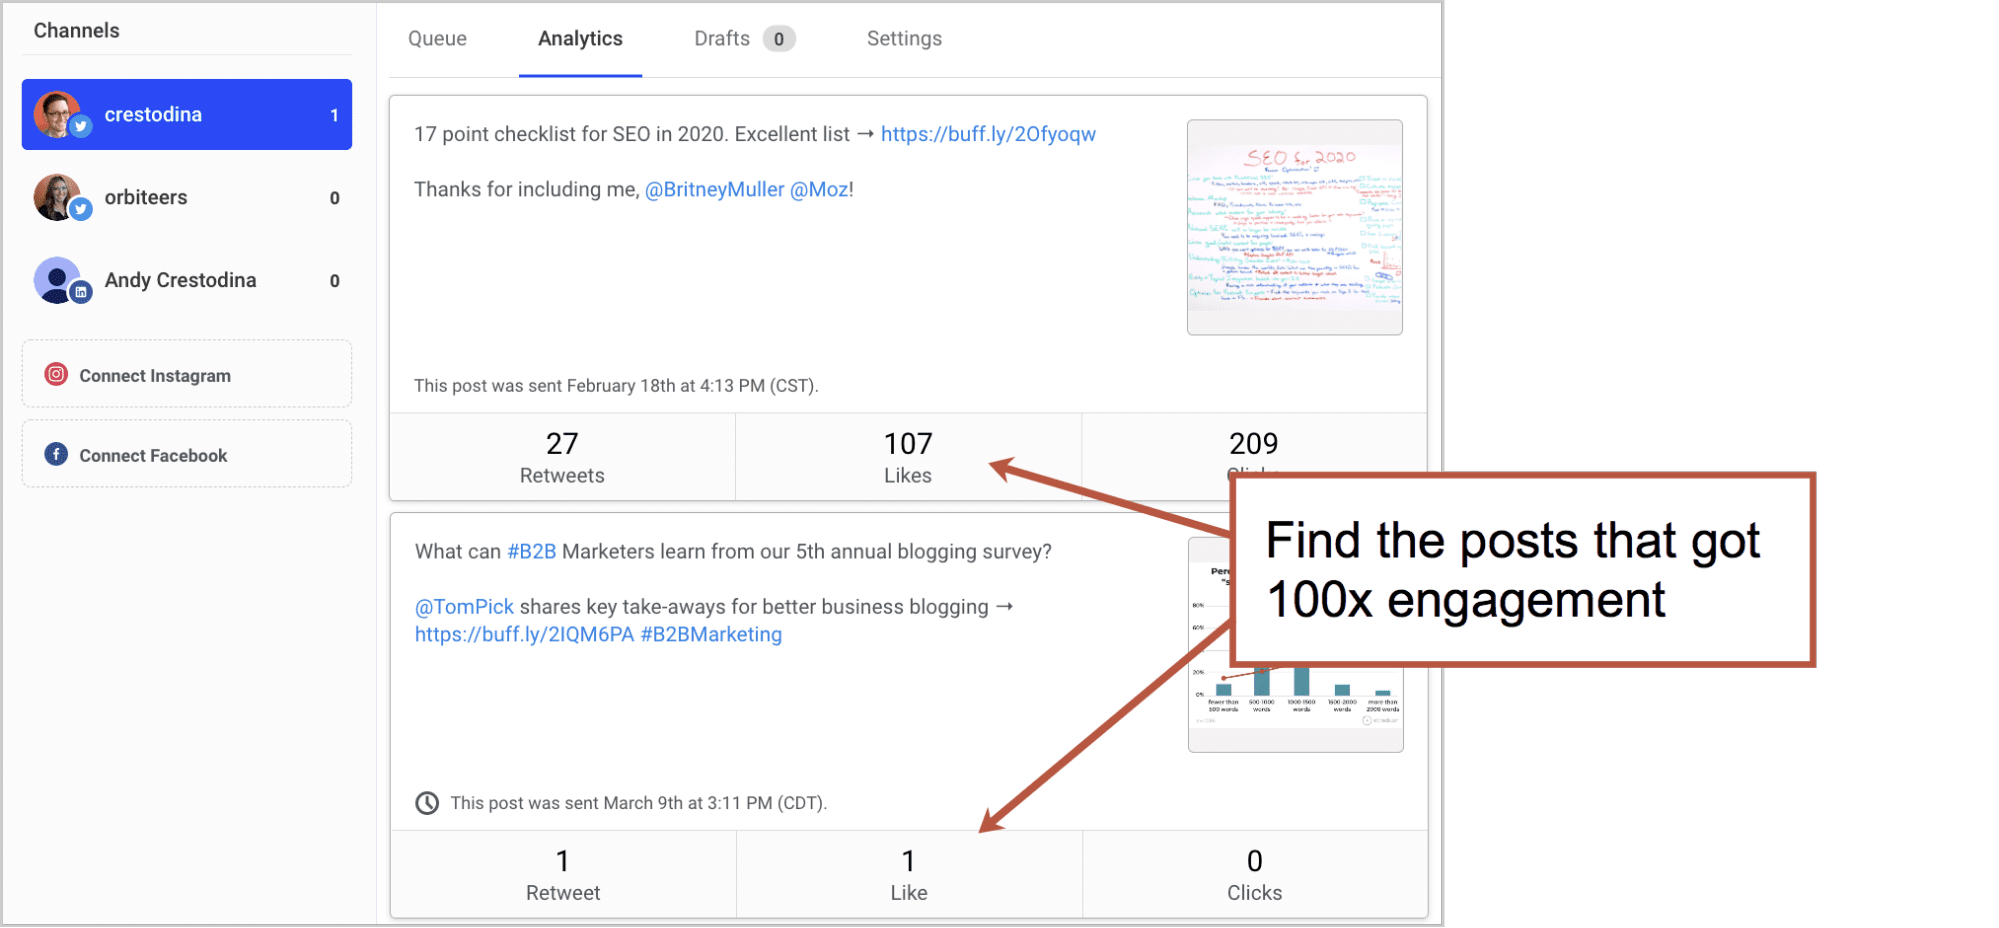
We don’t really care about clicks or traffic here. We’re just looking for visibility and follower growth.

You’ll probably find that a lot of the most engaging posts don’t even include links. They are sometimes just little tips or inspirational quotes

Keep tweeting these. Keep ‘em in rotation. And pin the best one to the top of your stream.

7. Tweet more

Now that you’re using data to decide what to share, this next tip will have huge value: increase your frequency.

Whatever your frequency was, double it.

There is no upper limit (that I know of) for how often to tweet. I know one marketer who tweets every 15 minutes. I know the guy. He has a huge following (500K+) and I asked him about frequency. He told me his goal is website traffic and that after testing, he learned that more is better.

Of course, you can’t spend all day manually tweeting. You’ll need a tool to automate these social media posts. Just turn up the dial and schedule more posts for more often.

That doesn’t mean you can set it and forget it. You still need to be there to engage with people who engage with your content. You still need to amplify.


Jay Baer, Convince and Convert

“You have to have it open. You can’t dive in and dive out. The way to grow a following is to be conversational and to add value to interesting, real-time conversations. You can’t do that if you post once a day at noon.


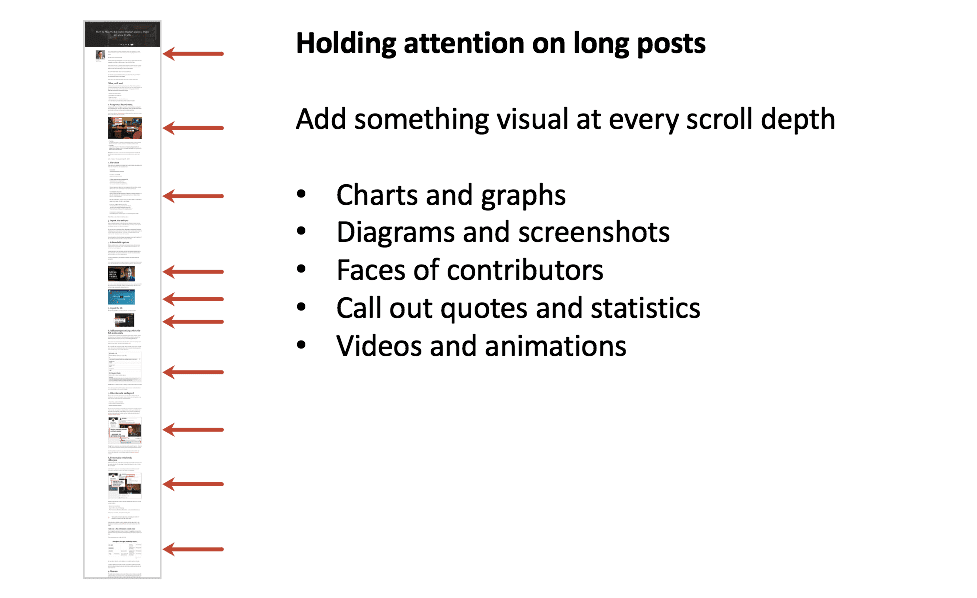
And beyond using Twitter for short posts, here’s a tip for bigger engagement through bigger content, right on the Twitter platform:


Jeremy Moser, uSERP

“Start creating content on Twitter itself. Use tweet-storm tactics and develop a thread of tweets surrounding a single topic. Within the thread, tag other active accounts, source quotes, and provide a coherent stream of consciousness on the subject. These are incredibly effective at getting compounding shares, as each threaded Tweet brings the original to the top of a user’s timeline. Mentioning others within these Tweet-storms takes advantage of Twitter’s algorithm, which now showcases what those users have liked (to their followers) directly on the timeline.


8. Find super-relevant people to share with

When you share something, whether you wrote it or not, share it with people who will love it. Twitter is a great way to find people with extremely specific interests.

If you wrote a post about personal branding, mention people with “personal branding” in their bio. They’ll likely thank you for it! They’re very likely to share it and follow you back.

Read the full post about targeted sharing on Twitter.

9. Link to your Twitter profile from everywhere

Let people know you’ve active on Twitter by linking to your Twitter bio every chance you get. Here’s a quick list of places where you can link to your Twitter account.

  • Your website
  • Your email signature
  • Your other social profiles
  • Your bio at the end of articles
  • Your presentations
  • Your physical signage

10. Connect with your friends from other networks

Twitter probably isn’t your only social network. You spend time in Facebook, Instagram, LinkedIn, Pinterest, WhatsApp, Reddit and Slack. You share, you engage, you make friends and you …can look for these same people on Twitter.

As you use other networks, keep Twitter open and in mind. Enjoying a conversation on another social media platform? Take a minute to find them on Twitter. There’s a good chance they’ll be happy to connect.

These will likely be high quality connections, since they’re people you already interact with.

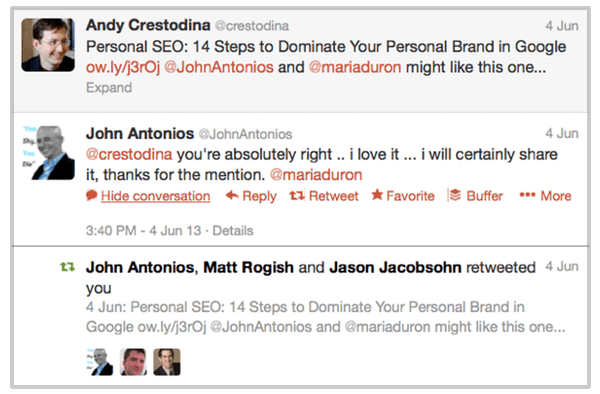
If they shared something of yours on another network, share it on Twitter, but mention them thanking them for sharing it earlier. They’ll be notified of the mention and they’re likely to share again (and follow you) when they see it on Twitter.

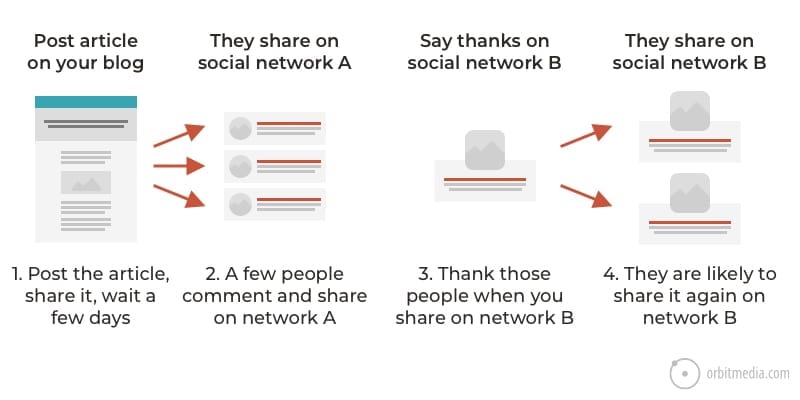
This builds stronger connections to more relevant connections, the ones that matter most in the end.


Tony Spencer, Take Spruce

“Social followings are more than just a number. If you want a social following that can make an impact on your business growth or success, they need to actually be interested in you or your brand. Otherwise, you have a bunch of followers who won’t convert.


Ask yourself: Why do you want a big following anyway?

Would the world be a better place if you have 100k followers? Would it really help your business? Your career? Your personal life?

Probably not.

Large Twitter followings are not usually very engaged audiences. And remember, organic reach in social media is low (likely only 2% of followers see anything you post in their stream).

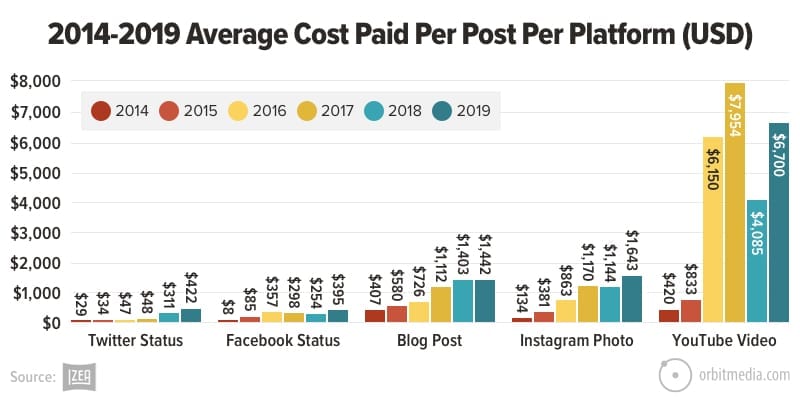
A large following in Twitter is worth less than other platforms. Here is the cost-per-post in paid influencer marketing. Only Facebook is lower.

So why the obsession?

Social media networks want us to obsess. They want us to stay on their platforms. They want us to play it like a game. That’s why they make the number of followers look like a score.

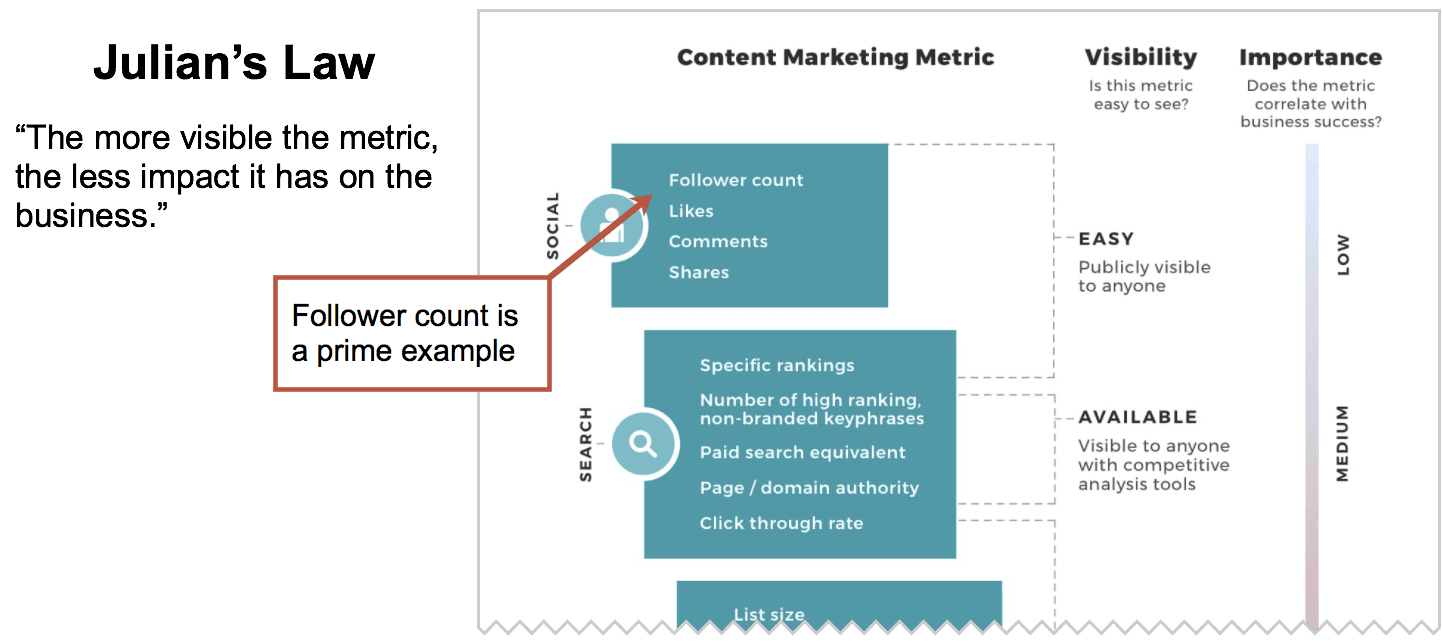
But the most visible metrics aren’t always the most important. In fact, the easier a metric is to see , the less impact it has on your business. We call that “Julian’s Law.”

In this post, we listed all of the content marketing metrics, from most visible/least important to least visible/most important. Here’s a preview of that post:


Followers, with benefits

If there are upsides to having a large Twitter following, they fall into a few categories. Each has their own factors in success.

  • Drive more website traffic? Yes, but only if…
    …your followers are engaged. Twitter is a powerful source of traffic, but only if your followers care enough to pay attention. If you have an auto-generated following or robots, you’re unlikely to capture this benefit.
  • Impress journalists and editors? Yes, but only if…
    …you already have their attention. Generally speaking, some content creators are more likely to be impressed and more likely to use you as a source. A large following is “social proof” which lends credibility in a PR context. This is a practical reason to want a large following.
  • Impress your friends? Yes, but only if…
    …your friends are into that kind of thing.

But the real benefits of Twitter (and of all social media and the internet as a whole) is the connections between people. It’s a powerful tool for research and networking, PR and influencer marketing. On Twitter, you can find almost anyone you can imagine and start a conversation.

Let’s close on a great quote from Ted Ruben:

“Make your social connections count or they won’t be worth counting.”

The post How to Get More Followers on Twitter (the Semi-Legit Way) appeared first on Orbit Media Studios.

from Orbit Media Studios https://www.orbitmedia.com/blog/how-to-get-more-twitter-followers/
via IFTTT


from
https://sarahbarnett0.wordpress.com/2020/11/04/how-to-get-more-followers-on-twitter-the-semi-legit-way/

Wednesday, October 21, 2020

Web Content Best Practices: Our 22-Point Checklist for Publishing High-Performance Articles

The 80-20 Rule states that 80% of the results come from 20% of the causes. A small number of actions get big results.

Big in content marketing, it’s more like 90-10.

Every glimpse into every Google Analytics account shows this clearly. The top-performing articles drive most of the impact, both on the traffic side and the conversion side.

This is true for traffic.

A small percentage of articles get most of the visibility, especially through SEO…

And this is true for conversions.

A few articles are much better than others at getting visitors to subscribe…

One of the main jobs of the digital marketer is to find these high-performers and then understand them better. How are they different? What makes them special? How could you create more content like these?

But the conclusions are usually the same. There are common traits that the top performers share. And when you put these traits together, you have a set of best practices for website content and content marketing.

These are our web content best practices

They are based on our experience publishing 500+ articles, surveys of 5000+ bloggers, and collaboration with 1000+ clients. We’ve combined them into one, big web content checklist.

So before you push the publish button, go through this list and make sure you’ve included everything. If you leave something off, do it deliberately.

We’ve broken this up into three separate lists, one for SEO, one for human psychology and one for additional media. Of course, there is overlap.

Here’s a printable PDF in case you’d like to check things off a paper list as you write your next post.

Download my checklist

Let’s take a closer look at each item…


Search Engine Optimization (SEO) checklist

We’ll start with SEO and traffic. Makes sense. If no one sees it, nothing else matters, right?

The following elements help indicate the relevance of the article. They are key places to use target phrases and increase the likelihood that the content will rank. Just make sure that you’re targeting a keyphrase that you have a fighting chance of ranking for.

Title tag

It’s in the tab above the address bar for every page you’ve ever visited.

Title tags are the single most important element for on-page SEO. Not only are they a powerful indication of relevance, but typically the title is the link on a search results page. The ideal length is 55 characters or the rest will be truncated. Be brief.

Use the target keyphrase once in the title. If possible, use it near the beginning of the title. The prominence of the keyphrase (in other words, how close to the beginning it appears) is important.

It might be tempting to put your business name at the front of the title. Don’t. SEOs have a saying: “brand last.” Start with your keyphrase, end with your business name. Remember, in content marketing your first goal is to help people. Promoting yourself comes second.

<H1> header

The header on the page should be formatted using the <h1> header tag. Use the target keyphrase once, indicating relevance to search engines and stating the general topic to headers. Beyond this, the headline should be written for readers. More on headlines in a minute.

Keyphrase use in the body text

Your target keyphrase should appear in the article. As you write, you’ll find yourself using the phrase naturally at least a few times.

There is no rule for the number of times you should use a phrase (it would be strange if there was) but if you’d like a general guideline, I’d say use the phrase 2-3 times every 1000 words. Something like that.

During editing, make sure it’s used, but not overused.

Warning: If it feels unnatural, don’t force it. Don’t overdo it on the keywords. Do not compromise your writing. If your keyword usage is obvious to a reader, you’re guilty of “keyword stuffing.” Repeating a phrase in unnatural ways is bad for readers and bad for rankings.

Semantically linked words

Here’s where SEO copywriting gets more fun.

Beyond using your target keyphrase, work in the words that are semantically related to that phrase. This is how you can target the topic, not just the keyphrase.

Indicating relevance for the more general topic is great for search rankings. A great page on your topic would certainly include closely related words and phrases, right?

For example, this article is a “website content checklist.” That’s the primary keyphrase and I’m using it, I’m sure (I’m not actually counting how many times). But a great content checklist should really touch on all the adjacent subtopics, relevant questions and related words.

So I’ll take a minute to see what Google shows as related words, topics and questions and incorporate those into this article.

Where do I find those?

  • I just start searching for the phrase and see what Google suggests.
    I write those words and phrases down and work those into my article.
  • I search for the phrase and look for a “People also ask” box.
    I write those questions down and make sure to answer some of them in my content.

This is the key to semantic SEO and the future of search engine optimization.

During this process, you’ll find yourself writing a more detailed, helpful article. Yes, SEO can make you a better writer.

Meta description

Although meta keywords are totally useless, the meta description remains important. Just like the title, it doesn’t appear in the content of the page, but it’s highly visible in search results.

The text in the search snippet is either an excerpt from the body text or the meta description. It’s a chance to sell your article and increase the clickthrough rate. So make it good.

Your meta description should be a single sentence, plain English summary of the content of the page. Use your target keyphrase at least once, but not more than twice. Limit it to 155 characters to be sure that it will fit within the snippet without getting truncated.


Human psychology content checklist

Each item in this next set of elements will align the blog post with human psychology. These can improve click through rates, time on page, bounce rates and conversion rates.

H1 header secondary headline

A headline is a promise. A great headline is a strong promise, giving the reader specific benefits to slow down, click and dive into the article.

Some of the top-performing headlines and actually like two little headlines smushed together. They name the topic, then name the benefit of clicking. After the keyword, add a dash, colon or parentheses, then then add a second headline with the benefit of clicking.

Here are examples of double headlines that separate the first from the second with punctuation. Each leverages another technique to catch readers’ attention

  • Use a number
    The Complete Hamster Training Guide: 5 Circus Tricks Rodents Love
  • Promise a specific benefit
    Hamster Training Tips – How To Train Your Hamster to Jump Through Hoops
  • Create urgency
    Train Your Pet Hamster (Before He Escapes Forever)
  • Trigger curiosity or emotion
    Hamster Training: This Furry Guy Learned This Trick in Just 10 Minutes
  • Ask a question
    What Tricks Can You Teach A Hamster? Training Advice from a Pet Rodent Expert

Resource: How to Write Truly Great Headlines.  That post has everything you need to win the click.

Subheads

Visitors aren’t really readers. They’re scanners who might read if we can slow them down. According to one study, visitors are reading 28% of words at most.

Adding subheads can slow down the scan reader. Break up your article into sections. These serve as mini-headlines for subsequent paragraphs, keeping visitors flowing through your content.

These subheads should be formatted using <h2> or <h3> tags, not just bolding.

Don’t worry too much about SEO and keywords when writing subheads. Go ahead and be as clever as you’d like. This is also a great place to use any headlines you rejected for the <h1> header.

Lists

A list-based article gives you a natural reason to use a number in your headline, telling busy readers that the article will be easy to scan. If it looks like a list, it’s an easier click.

But little lists can appear throughout the article. As in…

  • Use bullet lists whenever there are three or more distinct ideas in a section
  • Use numbered lists as a format for the entire article or whenever sequential ideas are presented
  • Avoid list formatting when telling stories with a narrative flow

Short Paragraphs

This isn’t college and your article isn’t assigned reading. So don’t make it look like a textbook. The back button is right there in the corner and they know it.

No paragraph should be longer than four lines maximum. Occasionally, drop in a very short paragraph of one sentence or even one word to add emphasis.

Designers have always known the power of whitespace. But somehow, writers didn’t get the memo.

Formatting

Subheads, lists and short paragraphs go a long way, but they aren’t the only way to make content more scannable.

  • Bolding, Italics
    Excellent ways to add emphasis and make content more easily scanned, but don’t overdo it.
  • Block quotes
    Your website should have options to call out key messages, just as newspapers and magazines have done for years.
  • Personal tone
    Readers are people. Write as if you’re writing for one, specific person. From you, to her.

Internal Links

Your goal is to eventually convert your reader into a lead or a customer. That means guiding them deeper into the site, and that means internal links.

“Your site is the mousetrap, your content is the cheese.” – Barry Feldman

If you don’t help make those connections between the cheese and the trap, you catch fewer mice. Here are four types of links to create every time you publish:

  • Link from the new article to a relevant older article
  • Link to the new article from an older article
  • Link from every article to a product or service page
  • Link from each article to the article of an authority or expert with supportive content (see below)

There is also an SEO benefit here. Links between pages help pass ranking potential between pages on your site, although these links have far lower impact on rankings than links from other websites. Internal links are also an easy opportunity to use target keywords in anchor text.

Resource: 3 Internal Linking Strategies for SEO

Contributor quotes

If optimizing for search means adding keywords, then optimizing for social means adding people. There are three main benefits to publishing collaborative content.

    • Improve the quality of the article
      The outside points of view adds both insight and credibility.
    • Improve the social reach
      The contributors may share the piece, improving the social reach. An ally in creation is an ally in promotion. This is sometimes called “ego bait.”
    • Grow your professional network. 
      Every article is a networking opportunity. Most people love to contribute to things. To them, you are a press hit.

Bonus: You can even use content as a way to open doors with influencers and potential clients. This is called zero-waste marketing because it creates value even before the piece is published.

Adding sources is easy. While writing, just reach out to an expert or influencer and ask them if they’d like to contribute a few sentences. If they do, add their picture and link to their website. Once it’s live, let them know.

It takes forethought, but it’s actually the least time consuming part of the content creation process.

Source: How to Write a Blog Post for SEO (Step-by-step video)

Examples and evidence

Great writers add evidence to support their claims. They add examples to improve clarity. Ideally, every point in your article is supported with data and examples.

There are at least five types of evidence that you can make your content more compelling.

  1. Research studies and statistics
  2. Charts and graphs with supportive data
  3. Stories and case studies
  4. Supportive resources
  5. Relevant (positive or negative) examples

If you cite research from others, make sure to let them know, if only by mentioning (and tagging) them when you share the article. They might notice and then share from their own channels. More mentions, more potential social reach.

Better yet, make the article itself a research piece. When you conduct your own original research, you make your brand the primary source for new data.

Sound ambitious? Maybe not. It’s actually becoming common, according to our own research on blogging.

The rise of original research among bloggers

Length and detail

Great articles are complete. They answer all of the top related questions. They don’t skip steps. They don’t stop short. They cover the topic completely.

But there is no ideal length for blog posts. So don’t start with a target word count. Yes, there is an average length for blog posts: 1269 words. That’s long. And it’s gotten longer year after year.

Blog posts keep getting longer. The average is now 1,269 words.

But length is not a search ranking factor. That’s why we’re in the “human psychology” section, not the “SEO” section. Using semantic SEO writing techniques may lead to higher word counts, but word count is never the point.

Yes, there are many studies that show a correlation between length and high-rankings, but writers who add length for SEO are likely adding fluff.

Do it for your readers, not for Google.

Detailed articles are engaging. They hold readers’ attention. You can check for yourself using your own data. Create a scatter plot chart using word count and time on page for your top articles.

We did and here’s what it looked like for us.

So how long should your article be? It depends on the topic.

Every blog post should be as long as necessary to cover the topic completely, and not a single word longer.

Calls to Action

Now that you’ve given your reader a detailed, high-quality, carefully constructed article, it’s time to let them show their gratitude. Every great post has a CTA.

“Subscribe.”

That’s the typical call to action for blog posts.

It’s the popup window. It’s in the right rail. It’s “in-line” within the body of the article. It’s the header of the blog. It’s the sticky footer you see below.

Wherever it appears, it should include three things: prominence, promise and proof. These are the three p’s of high converting email signup forms.

If not subscribe, the call to action can also be an invitation to leave a comment. End the post with a question they can answer with a comment. Or ask the reader to share other ideas that would complement the article. Or even invite the reader to disagree with you.

Author box

Your content management system probably makes adding a nice author box easy. Easy or hard, it’s worth the effort since it has social media and conversion benefits. The ideal author box includes the following:

  • Profile picture
  • Brief biography (usually just a few sentences)
  • Link to the author’s bio and other articles on your website
  • Link to other social media profiles


Media and visuals checklist

Here are ways to improve quality by adding more compelling media. Of course, you won’t add all of these to every article. But we recommend upgrading your content with these whenever possible. The more, the better.

Featured image

Articles with compelling images are more likely to be shared and clicked in social media. Content without a strong visual is not going to win attention in social streams. Images also make your message more memorable, thanks to the pictorial superiority effect.

Never publish an article without an image.

The featured image at the top of the article will likely be used in the social snippet if the article is shared. Most social media sites show a rectangular area of the image, which is roughly twice as wide as it is tall.

This “aspect ratio” of 16:9 means square-ish images get cropped. So images optimized for social media meet one of these two criteria:

  • They have a 16:9 letterbox aspect ratio or…
  • The main subject of the image is within the center vertically, rather than near the top or bottom.

Optional: Add the headline of the article (or a version of it) into the image itself to make it more meaningful, increasing the chance that it will get clicked when shared on social media.

We put our favorite blog image research and tips into this post.

Supportive visuals

Add an image every 500 pixels or so (every three or four paragraphs) to add visual interest at every scroll depth. In other words, at no point in your article will there be a screen of all text with no images.

The impact is measurable. A tool like Hotjar has scroll heatmaps that show how far down your visitors flow. The impact of multiple images is often dramatic.

Video

The combination of movement and sound make video a super compelling format for content. Adding video to the top of your posts is a powerful content strategy and a great way to get visitors to stick around.

We track the impact of video on website engagement using event tracking in Google Analytics. There is a huge difference in behavior between visitors who watch and visitors who do not. This is what it looks like in Analytics:

To maximize the percentage of visitors who watch the video (let’s call that the “view rate”) use a custom thumbnail with both the headline and a face. Here’s an example of a high-performing video thumbnail.

Audio

Similar to video, audio is a big media upgrade to any post. It’s also easier than you think.

  1. Turn the recording software on your computer
  2. Read the post in your own conversational tone
  3. Save as an mp3 file
  4. Upload to Soundcloud or Spreaker
  5. Embed the audio player of the file to the page by copying and pasting in the <iframe> code, just as you would a YouTube video.

It will look (and maybe sound) like this:

Click to Tweet

The easier it is to share, the more likely it will be shared. This is another simple way to optimize your content for social media.

Take a short, compelling quote from the article and write it as a tweet, using the link from the article, along with any hashtags and mentions. Put the tweet into Click to Tweet, then embed it into the article as a link or a little blue bird button.

It will look something like this:

PDF Download

The PDF is really a print simulation. It’s definitely not digital content best practices to make this the only version of an article.

But when the PDF is an alternate version of an article, added as a convenience for visitors who may want to download or print, then it’s added value.

The PDF is also a common format for the “lead magnet” or “content upgrade,” available to visitors who enter an email address. Of course, this kind of “gated content” is the cornerstone of marketing automation.

Links to PDFs can include an icon and an indication of the file size, similar to this:

PDF Download a PDF version of this Website Content Checklist (236 kb) >

Or include a button like this:

Download My checklist [PDF]

“Copy is not written. Copy is assembled”

These are the words of copywriting legend Eugene Schwartz. They’ve never been more true than today, in the era of content marketing.

A great piece of digital content is assembled from many little elements, words, images, tags, media and formatting. Each adds to the results in its own small way.

Did we miss anything? Anything to add? Trade tips with your fellow readers by adding a comment below.

The post Web Content Best Practices: Our 22-Point Checklist for Publishing High-Performance Articles appeared first on Orbit Media Studios.

from Orbit Media Studios https://www.orbitmedia.com/blog/web-content-checklist-17-ways-to-publish-better-content/
via IFTTT


from
https://sarahbarnett0.wordpress.com/2020/10/21/web-content-best-practices-our-22-point-checklist-for-publishing-high-performance-articles/

Monday, October 19, 2020

How to use Infographic Data Visualization to Attract Qualified Leads

‘Show, don’t tell’ isn’t just a term in entertainment—it’s fundamental to content marketing and exemplified in infographic data visualizations.

As the world moves increasingly online, visuals have become the key to engaging audiences—especially as brains process images 60,000 times faster than text. But, why infographics, you may ask?

Infographics are an excellent visual tool that combines text, charts, imagery, icons, and colors to tell memorable brand stories. These data visualization examples showcase how powerful and memorable infographics can be. They also position companies to share compelling stories to attract qualified leads.

In this article, we share seven tips so you can create data infographics that will boost your brand awareness and revenue.

1. Use the right kinds of infographic data visualization

Creating infographics that are meaningful and easy to understand can be tricky. For marketing teams without much experience with design, data visualizations become a huge hurdle.

But it doesn’t have to be this way. First, you need to understand some basics, such as how many kinds of data visualizations are available:

  • Charts
  • Diagrams
  • Maps

Now, some of these individual categories include a variety of visualizations, as well. Charts include the following:

  • Bar charts
  • Bubble charts
  • Line charts
  • Pictographs
  • Pie charts
  • Scatter charts
  • Wordgraphs

Diagrams can also be broken down into:

  • Fishbone diagrams
  • Flow charts
  • Mind maps
  • Wireframes

With so many options available, choosing the right visual becomes an obstacle for designers and marketers—and it happens early on in the creative process. So, which visual should you use for your infographic?

To make the right choice, you need to define the point of your data and your story. That is how you can pick a visual that conveys your message.

Here’s a simple infographic that clarifies how the different infographic data visualizations work.

infographic charts

Source: Venngage

Let’s break it down further. If you have one point of data—1/4 people surveyed used our tool—a pictograph will be sufficient to depict that information.

However, if you have multiple points of data that need to be compared, a bar chart will be able to convey the information to audiences better. In this product marketing chart from TryChameleon, you can see how multiple KPIs stack up against each other.

product marketing chart

Depending on the focus of your graphic and how many data points you have to share, you can choose the right visual to share your message with prospective leads.

2. Create trust with infographic data visualization

Trust is imperative in marketing—and when you are sharing data, it becomes even more important.

One of the best ways to build trust among leads is to compile your data from credible sources, that are unbiased and objective. Also, verify your data with at least two additional sources to ensure that the studies can be replicated.

Another way to portray trustworthiness is by visualizing your infographic data correctly. Look at the graphic on fast food below. While it clearly states which companies are bringing in sales, the comparison is distorted.

fast food chart

Using logos, which come in a variety of shapes, has distorted the data—because the logos can’t be transformed correctly. This leads to a massive imbalance in scale that doesn’t correspond to the numbers presented.

On the other hand, this stacked bar graph on digital transformation includes a clear axis and legend that shows the data at scale.

data at scale

Here’s how you can avoid data distortions that could potentially lose users’ trust in your brand:

  • Include a scale for your data so your information isn’t distorted
  • Don’t start your data baseline at points above zero
  • Don’t skew the size of the axes
  • Include both axes in the graphic
  • Avoid cherry-picking data to suit your message
  • Pick the right charts for your data
  • Stick to the norms of data visualization that your leads are accustomed to

Following these points will make it easier for you to create infographics that build trust in your leads.

3. Keep infographic data visualization simple

Designers can be tempted to create complex infographics—when you have a lot of data to share, designing a multi-layered graphic seems like the best option. But that isn’t the best way to approach design. According to a study on graphic design trends, simple infographic data visualizations are the norm.

This is because complex data should be simplified for the audience—if your design is complicated, people won’t understand it. Nor will they be able to decipher the data.

By overburdening the graphic with data, like in the example below, you run the risk of losing your audience.

bad data visualization

This infographic has so many colors and so many pie charts that potential leads will have no idea where to look or how the data points correspond to each other. Users will spend more time deciphering it than understanding the data—which will inevitably lead them to scroll past your content.

Data visualizations must stand on their own—when a person looks at it, they should be able to understand what information it includes and what the data means, like in this example.

houston real estate trends

Source: Venngage

This infographic can be easily consumed—the graphs are simple, the images are relevant to the topic, and the icons give the data context. While you can write a blog around your data to share your methodology, your data shouldn’t need additional information to make them understandable.

Infographics need to stand on their own to tell your story. With a simple visual, you can do just that and attract prospects to your brand to boost conversions.

4. Limit text in your infographic data visualization

The great thing about infographics is that you can combine text and graphics to share a complex story. But when you visualize data poorly, you end up adding too much text on the graphic to explain what the data is about, like in this example.

anatomy of winning a ted talk graph

The graphic doesn’t convey any information on its own—users have to read the sidebar to understand the data. That shouldn’t be the aim of infographic data visualizations—if you want people to read your graphic, you might as well create a blog.

The point of visual communication is to build connections between data—and to share information with as wide an audience as possible. If your charts aren’t standing on their own, then you haven’t chosen the right ones. Or, you’re trying to share more data than is necessary.

Make your data bite-sized and easy to consume, especially when you’re trying to reach multiple leads with a single graphic. The best way to do that is by using less text and more relevant visuals like icons, images, and illustrations, like in this example.

refugees chart

Typography and text should be a last-minute resort—used only when a visual can’t convey a data point. That is the best way to attract leads and increase conversions.

5. Using color in infographic data visualizations

Colors are an important part of visuals—they serve multiple purposes and give marketers a range of options for sharing their data. However, marketers and designers need to be careful when they incorporate colors in their infographic data visualizations.

Just because you have access to a large swathe of colors, doesn’t mean you use all of them. The color palette you choose should include a handful of colors, at the most.

Too many colors can become overwhelming, while too few will create connections between data that don’t exist. Three to five colors should be more than enough to convey information.

Keep your brand colors in mind when choosing colors—you don’t want to choose a palette that is similar to a competitor’s. Look at these Instagram statistics and how they use the brand colors for the platform to illustrate the chart.

instagram chart

You could also use different hues of one color. Or reduce color transparency to give your visuals more range. Remember that colors must have a purpose within your design—to convey information or to evoke a particular feeling within the user.

If you want to know how to choose a color palette, you can refer to this graphic.

color combinations

Source: Venngage

Colors already have a role to play in society—green means ‘go’ or ‘earthy’, while red is associated with ‘alert’ or ‘danger’, and blue makes people think of ‘coolness’ or ‘serenity’. When you create data visualizations, note how colors are perceived by users before you include them in your infographics.

Also, keep in mind that muted colors have been on-trend for the past couple of years and are showing no signs of abating. The color palette you choose for your infographic data visualizations should be muted—bright and bold colors will look jarring to audiences.

To understand the difference between muted colors and bold colors, here’s a simple graphic.

muted bold colors

Source: Venngage

A muted color palette doesn’t decrease the range of colors designers can use—but it makes visuals look more authentic and organic than bold colors.

6. Create hierarchies in infographic data visualizations

Your infographic needs to have a visual hierarchy—this will help users follow your infographic story as you mean to tell it. A visual hierarchy is an essential component of communication—because people assign context and importance to the patterns they observe.

You want users to find correlations in your data through the visual itself—and you can do this by creating a distinct hierarchy. There are numerous ways that you can create visual hierarchies within your infographic:

  • Different color hues
  • Decreasing font sizes
  • Grouping related elements together
  • Placement of text and visuals
  • Styling elements differently

Look at this example that depicts market segmentation for computer consumers.

computer consumer stats

Source: Venngage

The bar chart shows the market share hierarchy through the size of the bars and the color gradient. Users can infer the results of the research just by looking at the infographic—they don’t need any further explanation.

That should be the aim when creating visual hierarchies in your infographic—for users to be able to understand the data correlations at a glance.

7. Highlight information in infographic data visualizations

When you create a visual, you need to highlight key data instead of making your users seek it out. This is particularly important when you have complex data to share, or numerous percentages and numbers.

It can become confusing for users if you don’t draw their eye to the pertinent information. One way to do this is by using icons in infographics—they are a great tool to convey stories.

When paired with captions, icons also highlight important data in visuals. For example, look at the icon infographic below.

child labor stats

Source: Venngage

This visual is packed with data but the viewer never feels lost because the icons, text, and colors create a cohesive, albeit heartbreaking, story. Remember: when you’re trying to attract leads, the data you share should be relevant to them.

Gathering data and building a story around it takes time. When you create a visual to relay that story, you want to ensure that your users understand it easily.

By highlighting key components in the graphic, you can draw your audience’s interest and grow your leads.

Key takeaways: Understand the story behind your infographic data visualizations

Creating great infographic data visualizations can be a challenge. But when done right, these visuals can attract leads and boost conversion rates.

To recap, here are the seven ways data visualization can increase awareness of your brand:

  • Choosing the right kinds of graphics
  • Building trust in leads
  • Keeping visuals simple
  • Limiting text on visuals
  • Color use in visuals
  • Creating data hierarchies
  • Highlighting key information

With these points, your marketing and design team can source data and create visuals that will draw audiences to your brand.

The post How to use Infographic Data Visualization to Attract Qualified Leads appeared first on Orbit Media Studios.

from Orbit Media Studios https://www.orbitmedia.com/blog/infographic-data-visualization/
via IFTTT


from
https://sarahbarnett0.wordpress.com/2020/10/19/how-to-use-infographic-data-visualization-to-attract-qualified-leads/